Overview
This playbook covers how to set up and run snow operations in Aspire, from contract setup through storm dispatching, post-storm cleanup, and subcontractor billing.
Contract architecture and setup
Set wide-open contract dates
Set your snow contract dates wide open, for example, September 1 to June 1. Wide dates help for three reasons:
Route preparation: Aspire must generate tickets before you can route or schedule them, and no tickets are available to route until the contract start date.
Early-season snow: Tickets are active and ready to dispatch right away if an unexpected early storm hits.
Late-season snow and variances: As Needed tickets aren't available for dispatch after the contract end date. Running seasonal tickets after the end date creates a variance.
Tip: To keep $0 billing months off customer-facing documents, use a custom invoice layout that hides them.
Set T&M equipment costs to $0
Set the unit cost to $0 for every time and materials (T&M) equipment item in your catalog. If you add an internal cost to the equipment, Aspire treats it as cost of goods sold (COGS) and deducts that value from your inventory holding accounts on the balance sheet, which throws off your accounting.
Instead, keep the cost at $0 and use custom billing rate overrides that bundle labor, fuel, wear, and profit margin.
Choose Multi-visit or As Needed
Use Multi-visit only for seasonal services with the Fixed Payment invoice type, where the customer pays set amounts on a payment schedule however many visits it takes, unless you cap them. Multi-visit lets crews clock in and out of the same ticket many times over several months without completing it.
Don't use Multi-visit on Per Service or T&M services. If you do, crews can't complete the ticket from Aspire Mobile. Someone in the office has to complete it manually, which delays billing.
Tip: To track hand-shoveling labor on T&M contracts, set up manual shovelers as an Equipment item with a $0 unit cost. Crews can then track billable equipment hours alongside, but separate from, their payroll clock-ins, so payroll hours don't get inflated.
Important: Name your snow division exactly Snow, with no extra words or characters. When a system administrator turns on Snow Mode and a crew leader turns it on in Aspire Mobile, Snow Mode shows only services in the Snow division and changes the field interface for fast-paced winter storms.
Storm production and dispatching
Dispatch the lowest depth range for range billing
Always dispatch the ticket for your lowest depth range, such as 0–2.99 inches, to your field crews. This removes guesswork in the field, so crew leaders don't have to estimate accumulation or decide which rate to bill.
After the storm, the office uses bulk tools in Aspire to swap the dispatched ticket for the actual depth range.
Set default routes and a holding route
Before the storm, assign default routes to the snow services you'll schedule. From the Schedule Board, open the Schedule an Event screen, select your snow services, then select Bulk Actions > Set Route and Sequence #. You can set default routes only after the contract start date.
Then create a holding route whose name starts with an asterisk, such as "*Holding Route". The asterisk sorts the route to the top of your alphabetical list, giving dispatchers one central place to stage and review unassigned tickets before moving them to active routes.
Tip: Add property tags such as "Zero Tolerance", "2-Inch Trigger", or "No Weekends". On the Schedule an Event screen, filter by these tags to quickly bulk-select and dispatch targeted lists of properties as a storm develops.
Post-storm reconciliation and auditing
Run the four-step post-storm cleanup audit
Run this audit in the office right after every major weather event to prevent billing backlogs:
From the Scheduling module, select the three-dot icon, then select As Needed Exceptions to find and resolve any tickets that weren't worked or dispatched.
Check for stray costs. Filter for open tickets with actual costs greater than $0. Review these costs, then consolidate or move them as needed.
Run a zero-dollar sweep. Filter for open or scheduled As Needed tickets with $0 actual cost, then select Bulk Actions > Delete As Needed Tickets.
Complete and invoice. Complete the remaining validated As Needed tickets so they're ready for billing. Leave seasonal (Multi-visit) tickets open until the season ends.
Adjust depths on per-service tickets in bulk
Instead of opening each ticket to change its billing depth, go to the Work Tickets module, select the tickets you want to update, and select Bulk Actions > Swap As Needed Service.
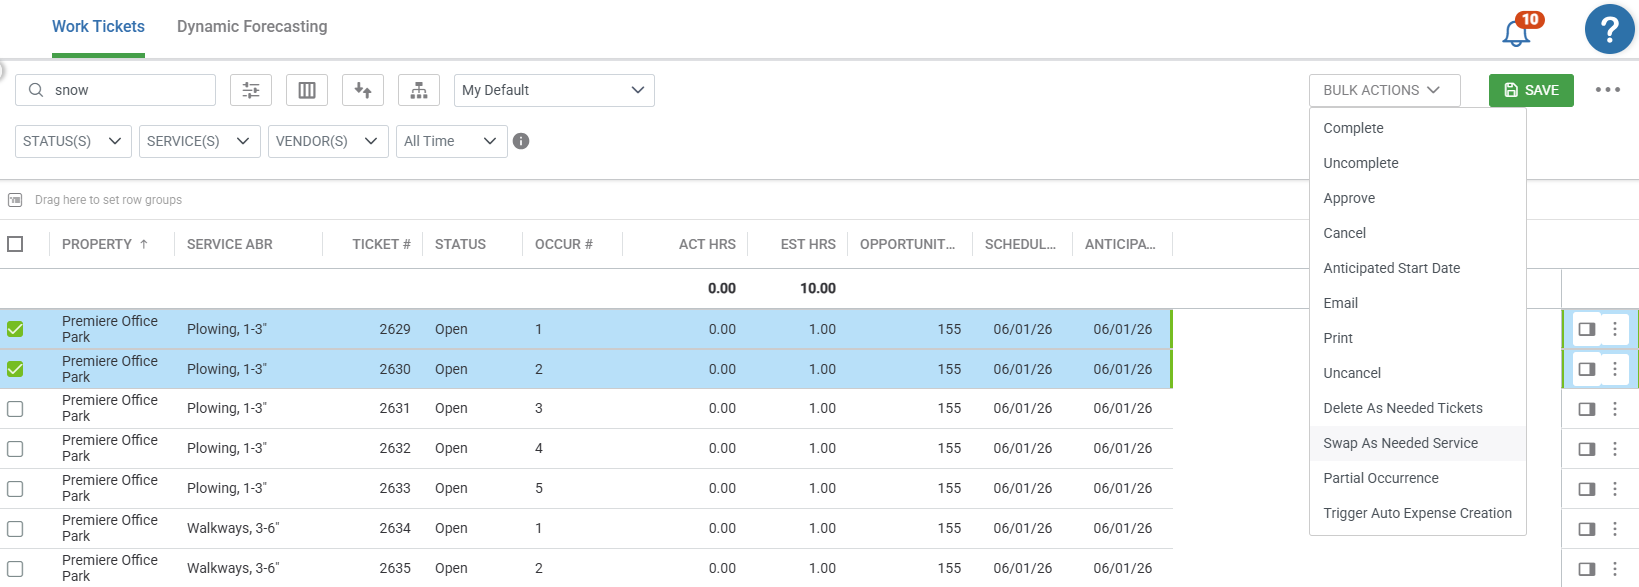
This swaps your low-depth dispatch ticket for the actual storm range in seconds, so billing stays accurate across your portfolio.
At the end of the season, close out your seasonal tickets and contracts. For more information, visit Closing Out the Snow Season.
Subcontractors and billing integrity
Have subcontractor crews use Aspire Mobile
Have your subcontractors use Aspire Mobile, even in your first season with Aspire. Aspire Mobile captures GPS-verified clock-ins and real-time labor data that feed your margin and capacity reports right away.
The Subcontractor Portal is also an option. Subcontractors enter their time in the portal after the work is done, so you won't have live data during storms, and billing reconciliation can take longer.
Tip: When you set a contact's Contact Type to Sub on their Contact record, Aspire Mobile limits that subcontractor to the routes assigned to them.
Automate subcontractor expenses
Set up subcontractor auto expenses on each opportunity service, from its Service Details screen. You can set the fee type to Flat Fee, Hourly, or Catalog Item. Fixed Payment services need Hourly or Catalog Item payouts.
To set up auto expenses for many services at once, use the Auto Expense Wizard on the Auto Expense tab of the subcontractor's company. The wizard works only with Per Service services and doesn't offer Flat Fee payouts.
Once the subcontractor's time is accepted and the ticket is Pending Approval or Complete, Aspire creates the auto expense in the Purchasing Assistant. The office then creates the purchase receipt, so the costs land on the work ticket and your margins stay accurate. Seasonal tickets stay open all season, so their expenses generate only when you select Bulk Actions > Trigger Auto Expense Creation in the Work Tickets module.
Test your invoices before you send proposals
Test your setup all the way through invoicing before you send customer proposals. Don't wait for the season to start.
Create test opportunities for each invoice type, including seasonal, per-service, and T&M. Check how your T&M prices calculate and how T&M overrides display on your final invoice layouts. We don't recommend minimum charges or minimum hours on snow T&M services. Testing early matters because the results may show that you need to adjust your service setup, pricing, or layout settings.
Tip: Finishing this testing before you deliver proposals helps prevent invoice formatting disputes later.
When you preview your T&M test invoices, adjust your layout settings to hide internal details, such as internal operator wage tables, so customers get a clean, readable invoice.