---
title: "Setting Up Sales Tax in Aspire"
slug: "setting-up-sales-tax-in-aspire"
tags: ["Language - English", "Area - Administration", "Industry - Landscaping", "Type - Task (How-To)", "Role - System Admin", "Role - Branch Admin", "Skill Level - 1 (Beginner)"]
updated: 2026-04-24T14:24:48Z
published: 2026-04-24T14:24:48Z
canonical: "guide.youraspire.com/setting-up-sales-tax-in-aspire"
---
> ## Documentation Index
> Fetch the complete documentation index at: https://guide.youraspire.com/llms.txt
> Use this file to discover all available pages before exploring further.
# Setting Up Sales Tax in Aspire
Purpose
Aspire helps companies make sure that sales tax is collected from their customers accurately. This is done by setting up *Tax Jurisdictions* that contain *Tax Entities*. Then, they are connected to each property with the appropriate *Tax Jurisdiction* based on the property's location.
Aspire uses the *Tax Jurisdictions* and their assignment to properties to automatically calculate tax on jobs performed for your customers!
*Services* are also set up to help tell Aspire which item types should be taxed in each state that you do business.
The basic steps for setting up *Sales Tax* in Aspire are:
- Set up *tax entities* and *tax jurisdictions.*
- Adding taxable items to *services.*
- For primary state of operation
- For other states in which you operate
- Adding *tax jurisdictions* to properties
This article discusses these concepts, provides best practices for setting up Aspire to manage your sales tax, and provides detailed instructions for each of the steps above!
> [!NOTE]
> Note:
>
> This article covers manual set up of Sales Tax. If you are looking for Avalara integration related content, select [here for the Avalara article collection](https://guide.youraspire.com/docs/avalara-integration).
Overview of Tax Jurisdictions and Tax Entities
*Tax Jurisdictions* are defined geographical areas with specific sales tax rules. Examples of Tax Jurisdictions could be federal governments, states or provinces within a country, county and special tax districts.
Each tax jurisdiction is made up of one or more *Tax Entities*. Each *Tax Entity* requires a certain percentage of sales tax to be collected for the sale of goods or services.
Consider *Tax Entities* like the organization, location or individual that is subject to taxation in a specific *Tax Jurisdiction*.
The example below shows the relationship between a *Tax Jurisdiction* and a *Tax Entity*:
- Tax Jurisdiction
- State Tax Entity
- County Tax Entity
- City Tax Entity
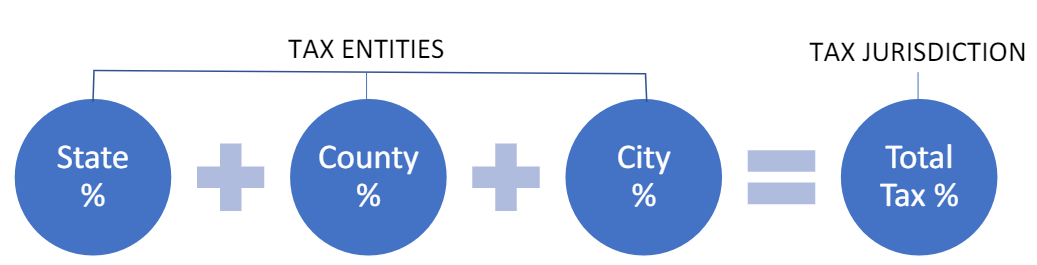
For example, a property in a certain city may have three different sales tax percentages for:
- the state
- the county
- the city
Each of these entities, the state, the county, and the city, would be created and then assigned to the *Tax Jurisdiction.*
The same *Tax Entity* can be used in multiple *Tax Jurisdictions*. If you have the same state for multiple cities where work is performed, you would just create the state entity once, and then apply it to multiple tax jurisdictions that are located in that state.
📌 Note: All properties in your system must have a *Tax Jurisdiction*, regardless of whether you charge sales tax or not. However, the setup for companies that are not required to collect income tax is very simple (click [here](/user-guide/docs/setting-up-sales-tax-in-aspire#jurisdictions-in-aspire-when-not-collecting-sales-tax) to skip to this section).
How Tax Jurisdiction Sales Tax is Calculated
The total tax for the jurisdiction is based on the sum of the sales tax for each of the entities in the jurisdiction.
For Example:
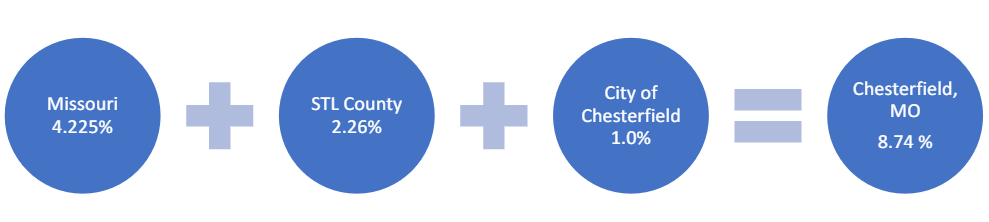
Examples of Tax Entity and Tax Jurisdictions
Suppose that in the state of Missouri, businesses are required to charge sales tax. At the same time, Callaway County also charges a specific sales tax. Individual towns in Callaway County charge sales tax, too.
A company doing work in the cities of Vandiver and Mexico might set up Tax Jurisdictions as shown in the chart:
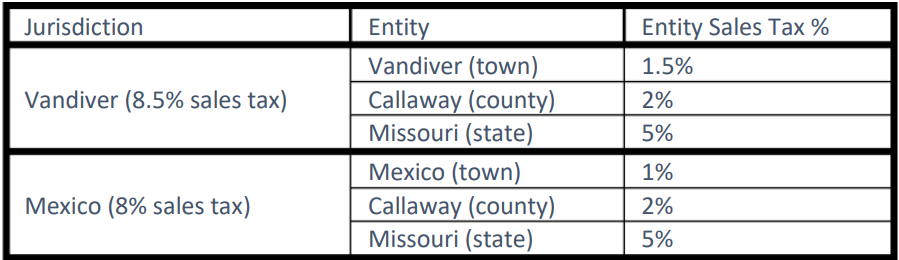
However, in Boone County, individual towns *do not* charge sales tax. The *Tax Jurisdiction* might look like this:

In these examples, there is one Missouri entity, but it is used in three different *Tax Jurisdictions*: Vandiver, Mexico and Boone County.
Similarly, there is one Callaway entity which is referenced in two different *Jurisdictions*: Vandiver and Mexico.
Jurisdictions in Aspire When Not Collecting Sales Tax
In Aspire, every *Tax Jurisdiction* must have at least one *Tax Entity*. Companies who are not required to collect sales tax from their customers, will likely have a single *Tax Jurisdiction* called something like *Exempt Jurisdiction* that contains a single *Tax Entity* that is called something like *Exempt Entity*.
The *Tax Entity* would be created first with a 0% sales tax rate and the *Tax Jurisdiction* would be created with the one *Tax Entity*. Then, all properties would be assigned to the *Exempt Jurisdiction*.
Creating Tax Entities and Tax Jurisdictions in Aspire
Before creating your tax jurisdictions, consider all the tax entities that will need to be created first. Since tax jurisdictions cannot be created without tax entities, it is important to create the tax entities first *then* create the tax jurisdictions.
🧠 When determining the tax entities needing to be created, start with the most general tax entities first, such as the states your company operates in!
Creating a New Tax Entity
- Determine the tax entities in all locations your company currently performs work.
- Based on the tax entities you have identified, set up your tax entities by going to *Administration* ➡️ *Application* ➡️ *Lists*
- Click *Select a List* and select *Tax Entity*. 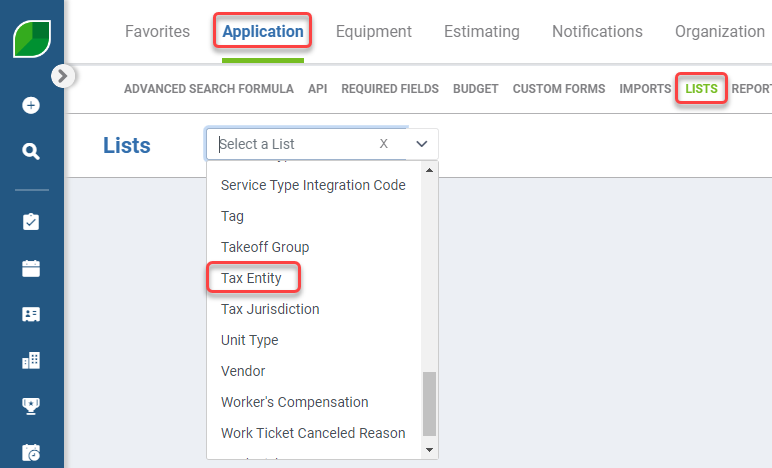
- To create a new *Tax Entity*, select the *New* button. 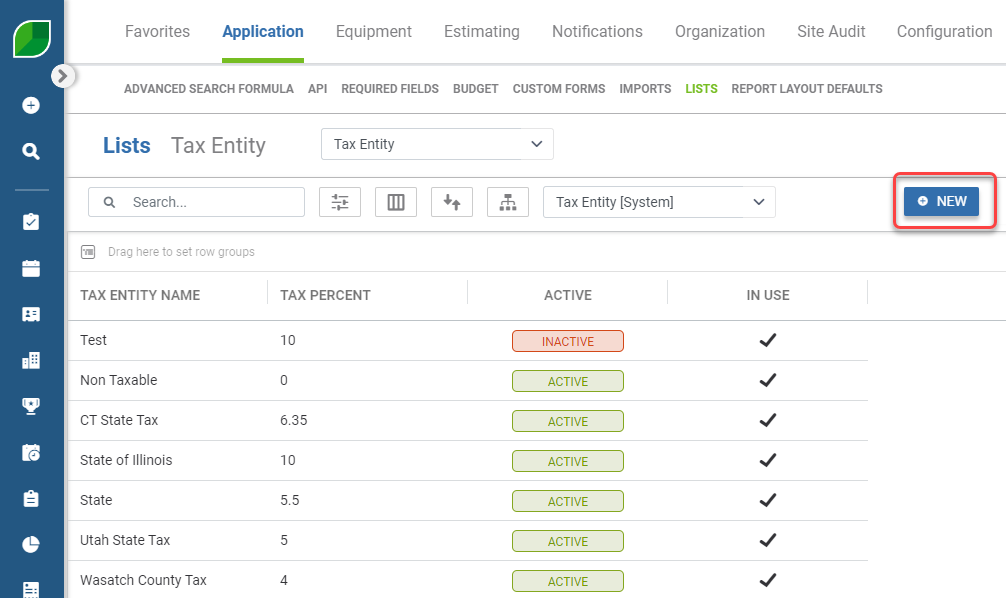
- Enter the name of the *Tax Entity* along with the associated *Tax Percent.* Your tax percent is given by your local, county, or state government.
📌Note: Be as specific as possible with your *Tax Entity* names.
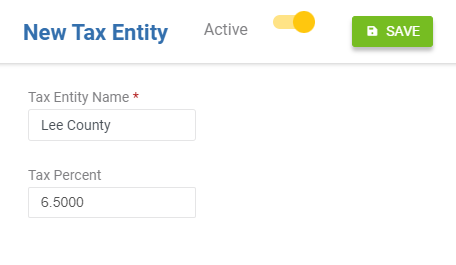
- Select *Save*.
Repeat steps 4 through 6, until all of your tax entities have been entered.
Creating a New Tax Jurisdiction
*🧠* After creating the tax entities, you'll then need to create *Tax Jurisdictions*.
- If not already in Administration, navigate to *Tax Jurisdictions* by going to *Administration* >*Application* >*Lists*
- Select *Tax Jurisdiction* from the drop down. [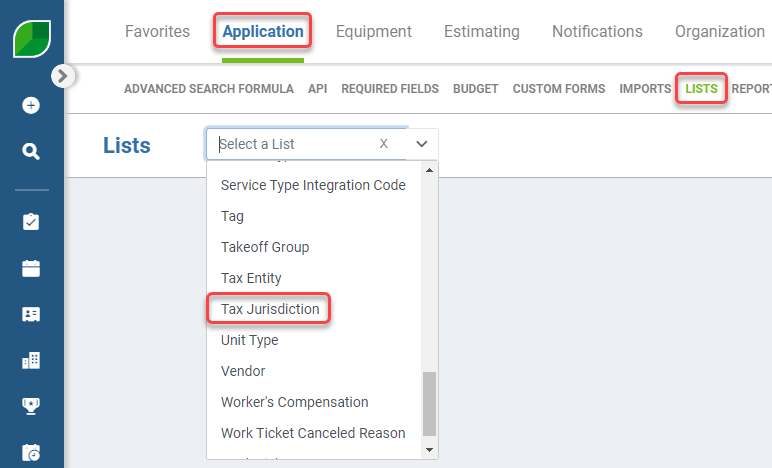](https://aspire-software.intercom-attachments-7.com/i/o/1092141389/d3e49052872834b68d4cb081/AD_4nXe8Cz6Y9h1wTP3xYgaOXDeR1QRDbHE9lQkHIbbtEm3TMv6Adr5WnpPmNXzbGWpp6UlN4hRyXacoWzY-AyoeHDn-qVBxteKeQiHGJeg93T_l9mrrBkN4ezu49PNub1JlCJKR6gL66YS3lrmCJjsab-ERfwbh?expires=1757535300&signature=957fce7bcb7883ddeecdbf0799f22f45615be30b2fad1c0616240caf93157291&req=dSAuFMh6nIJXUPMW1HO4zciOfBHw7sz7DjHM90u%2BkUN6PSMLfS15Ir8CHE1m%0A49y0%0A)
- To create a new *Tax Jurisdiction*, select the *New* button. 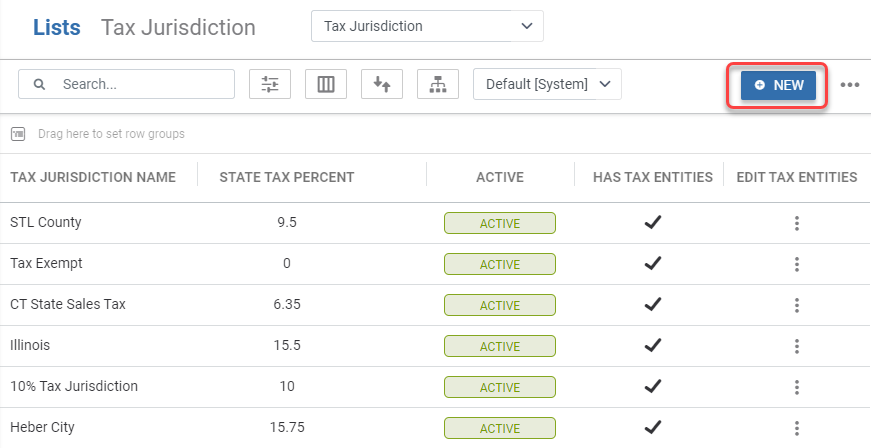
- A new screen will appear.
- Enter the *Tax Jurisdiction Name* and the *Federal Tax Percent*. [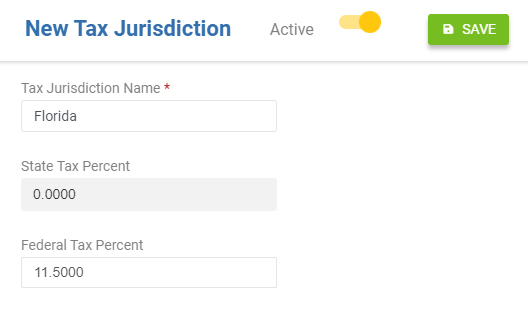](https://aspire-software.intercom-attachments-7.com/i/o/1092141417/1c76db43d1ae9191d4aba5f2/AD_4nXfgP2CCFfblv3v7k887QeynyWaxonERwW-W17DCeFlsXVvZmIegYIoP-Av93rR5gSoppl1k4v_kY1UBfOiT9Yu_cDnDLuGW1qwx5pq8hUQ1CE6BLKjkvbXQDgBAkGxuxLy63f1neM_ycsSpXDaoiFL_srzN?expires=1757535300&signature=4350623216360a0ae311237791aa2a66fc52b9856ee6db40276dc44a6fc2bfa2&req=dSAuFMh6nIVeXvMW1HO4zdpZAHjgf1QFRN6mSF6dZYypnwzQUnODXrj6rvjV%0A2Msy%0A)
- Click *Save*. This will take you back to the *Tax Jurisdiction*list.
- Next, we'll need to add the tax entities to the newly created tax jurisdiction.
- On the main screen of the *Tax Jurisdiction* list, select the three vertical dots of the *Tax Jurisdiction*that need to have the entities added.
- Select *Edit Tax Entity*.
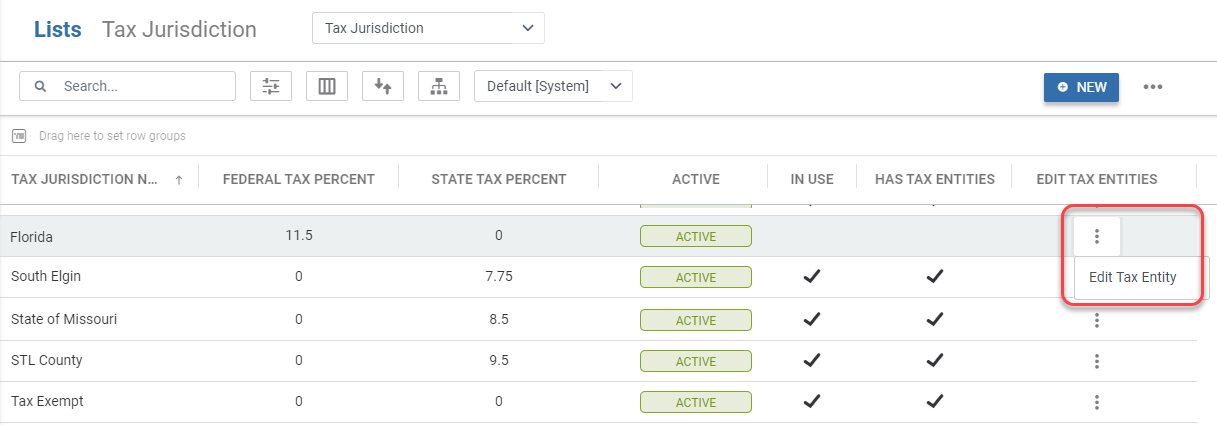
- You will be taken to the *Jurisdiction Entities* screen. Select the blue *New* button and the *Jurisdiction Entities* screen will appear. 📌 Note: You can click the *New* button more than once at a time for each entity that will need to be added. 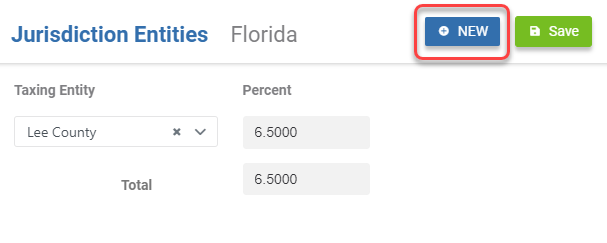
- Click the *Select One* dropdown and select the appropriate Tax Entities for this Tax Jurisdiction. The newest created Tax Entities will be at the bottom of the list. 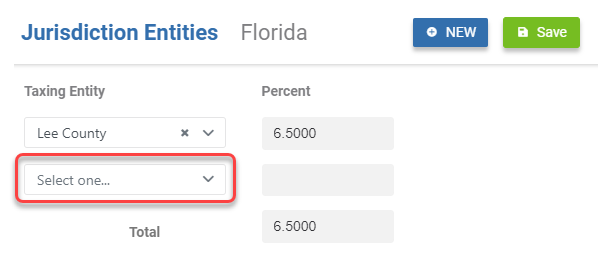
- When all the necessary *Tax Entities* have been assigned, select *Save* in the upper right. This will take you back to the *Tax Jurisdiction* list.
Repeat steps 3 through 9, until all of the necessary tax entities have been assigned to a Tax Jurisdiction.
Choosing What Item Types Are Taxable for A Service
After you have created your *Tax Entities*, you can then specify for each service what types of items are taxable in each state you operate in.
You can specify taxable service types as you initially set up your services, or you can go through your service catalog later to specify taxable service types.
In either case, this setup is done at the *Service* level, because some states have different sales tax requirements depending on the service.
For each taxable service, perform the following steps:
- Go to *Administration* ➡️ *Estimating* ➡️ *Service Catalog.*
- All existing services will appear. Select a service from the *Service Catalog* to display the specific service to add the taxable items to.
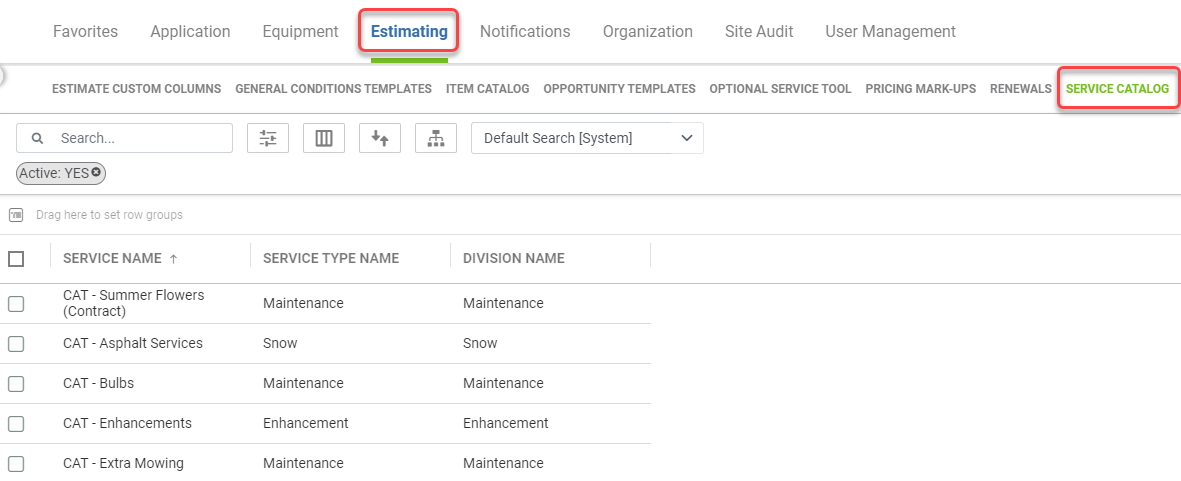
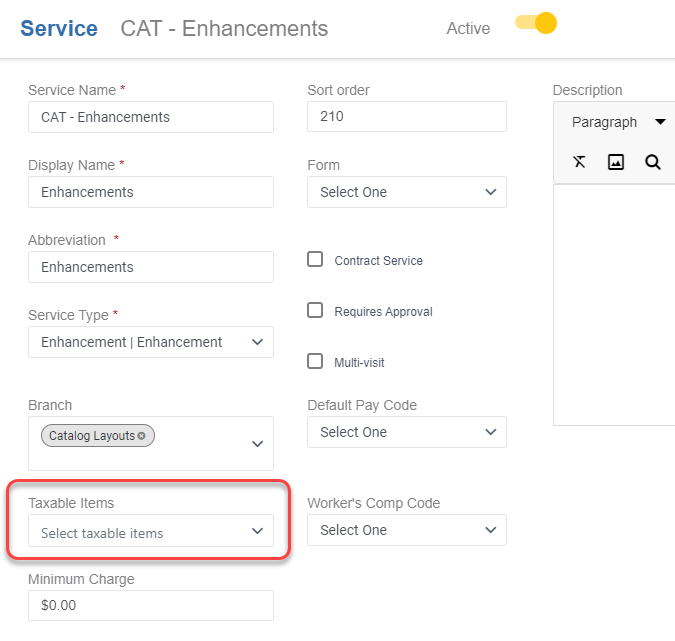
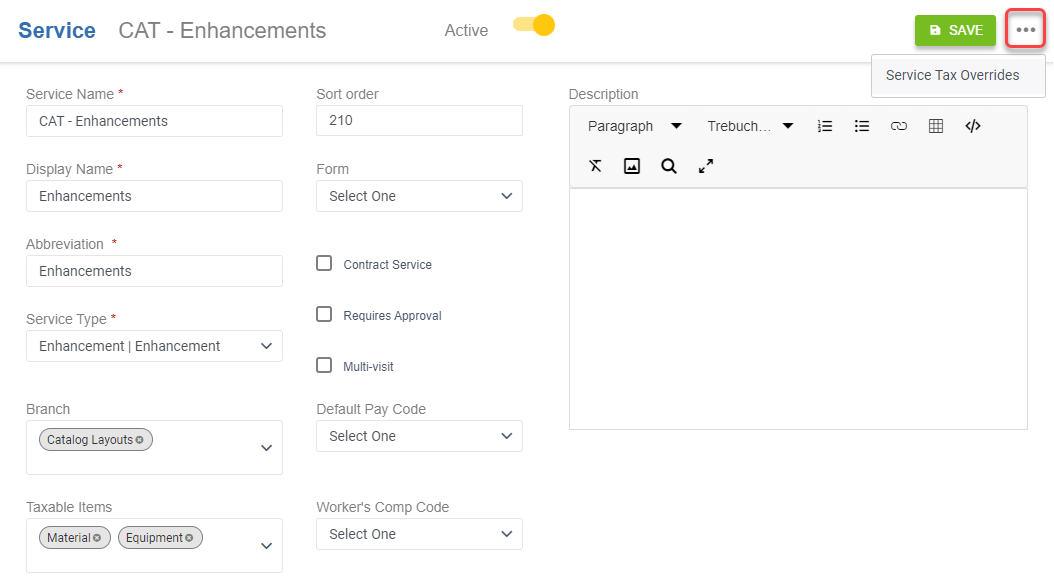
- The service detail screen will appear. Set your taxable item types in *the primary state* of operation for the particular service being updated by selecting the drop down menu under *Taxable Items*:
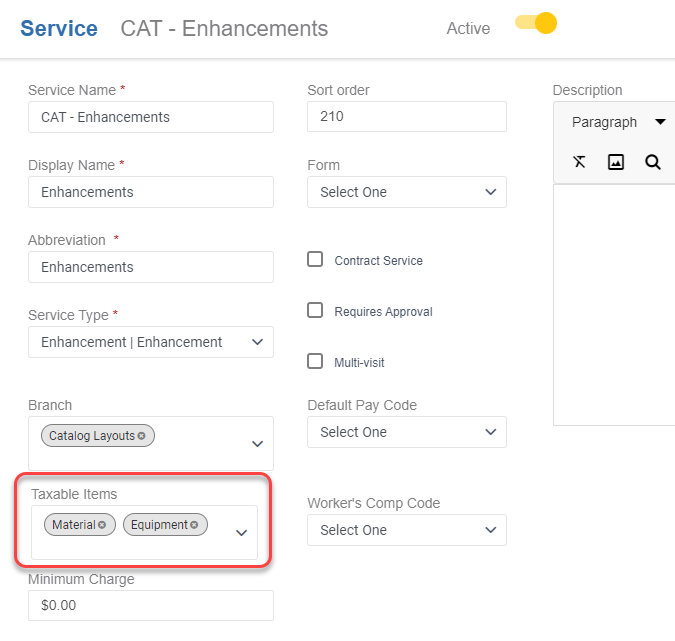
- Select the items that are taxable for this service. You can select more than one!
- To set the type of items that are taxable in states that are *not your primary state of operation*, click on the three dot menu at the top right corner of the page and then select *Service Tax Overrides*.
- For each state that you do business in other than your primary state, click the *New* button in the upper right to add a line, and then check the box for each service type that is taxable in that state.
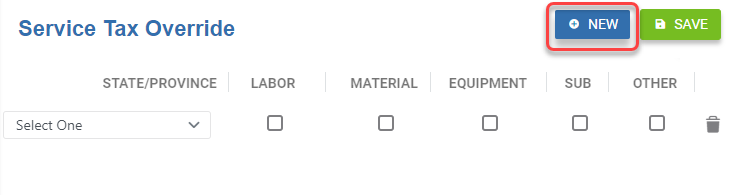
- When you are finished, click the *Save* button to apply your changes.
🧠 To make sure your changes will save on the primary tax override, it may be best to setup the *Service Tax Overrides* of the other states your company services *first*, click Save, use the back arrow of your browser, and then put the primary *Tax Override* on the *Service*.
Adding Tax Jurisdictions to Properties
⚠️ A *Tax Jurisdiction* should be added to *all* properties even if you are not required to charge sales tax.
There are two ways to add the *Tax Jurisdiction* to a property:
- Individually: By clicking into and editing the property record
- In Bulk: By selecting *Properties* and applying the same Tax Jurisdiction at once through *Bulk Actions*.
Adding a Tax Jurisdiction to a Property
- From your *Dashboard*, click the *Properties* module from the blue side menu.

- Search and select the property you would like to add the *Tax Jurisdiction* to.
- Select the three dot menu at the top right corner of the screen and select *Edit Property*.
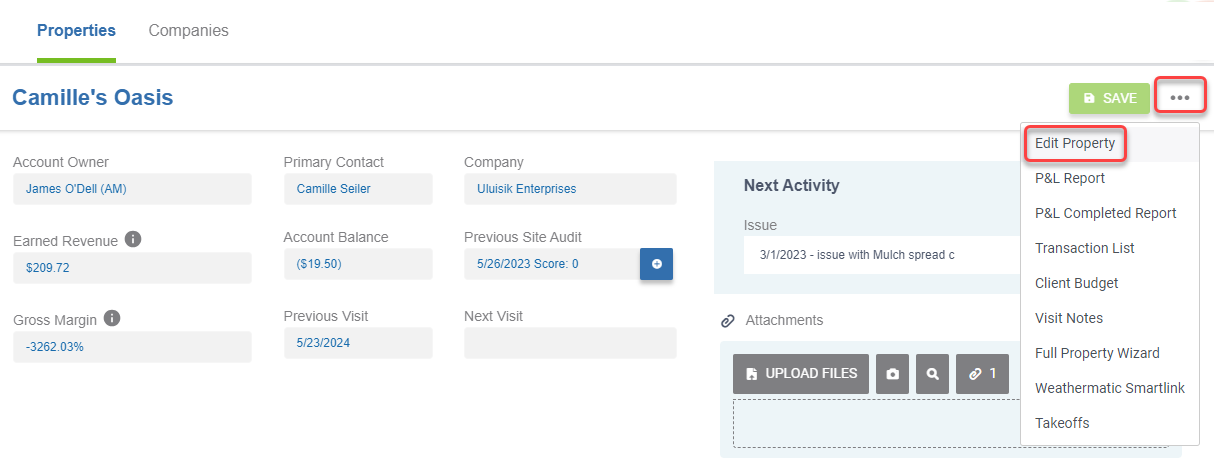
- Additional property information will appear. Select the drop down menu under the *Tax Jurisdiction* field.
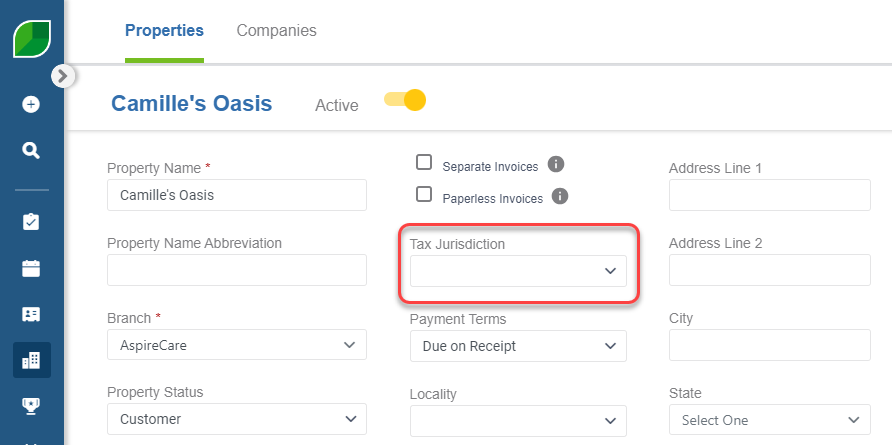
- Select the appropriate *Tax Jurisdiction* that was setup in *Administration*. 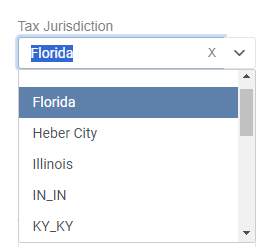
- Click *Save* in the upper right.
Adding a Tax Jurisdiction to Multiple Properties in Bulk
- From the home screen, click the *Properties* module from the blue side panel.

- If your property addresses are correct, you can filter your properties to specific information (such as city name or zip code) that a single *Tax Jurisdiction* would be applied to.
- Check the boxes next to each of the properties that need to be updated. *If the list is filtered by a specific factor, you can check the checkbox in the header row.*
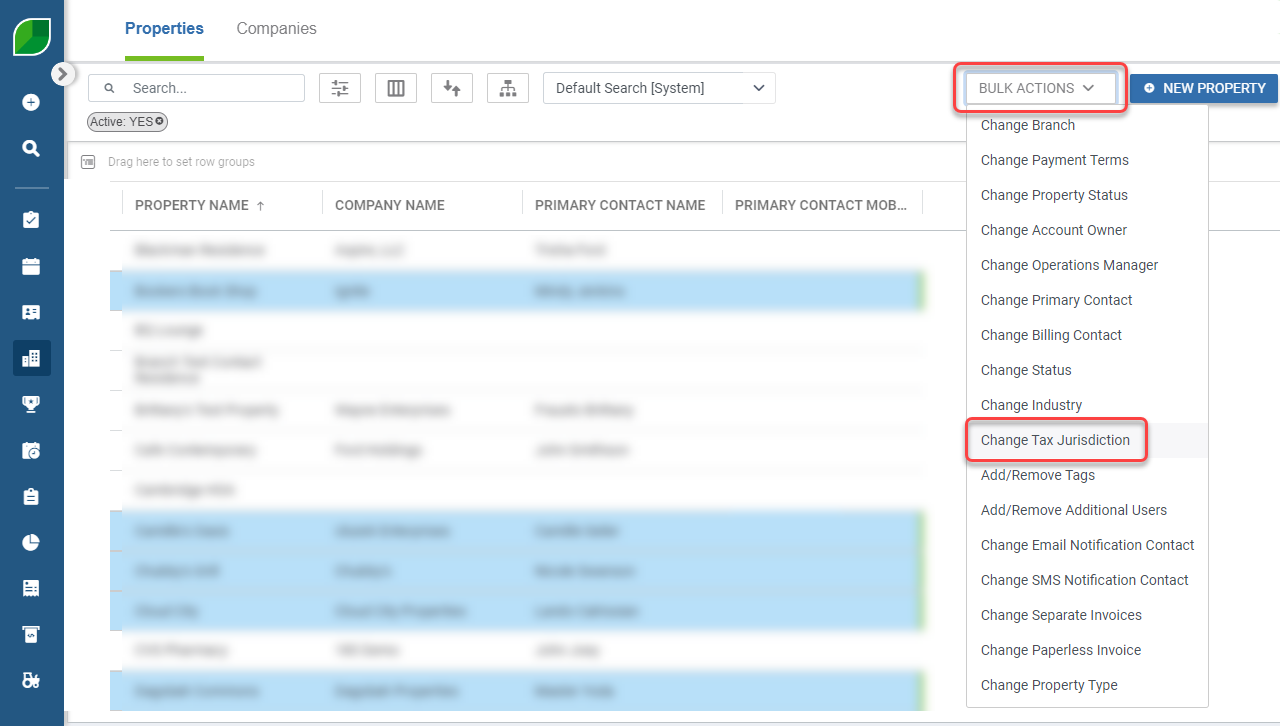
- Select *Bulk Actions* and a drop down menu will appear. Select *Change Tax Jurisdiction*.
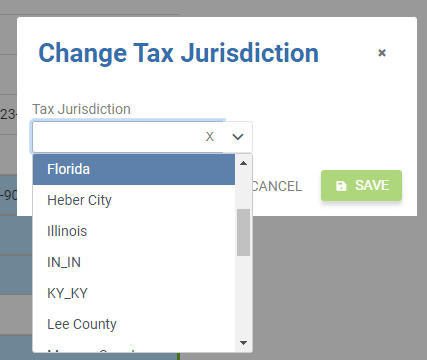
- Select the needed *Tax Jurisdiction* for the selected properties and click *Apply*.
⚠️ *Bulk Action* changes cannot be reverted back, so make sure you want to use this method! Otherwise, another *Bulk Action* will have to be used to overwrite the properties that were changed.
Finding Remaining Properties with No Tax Jurisdiction
To make sure that all of your properties have a tax jurisdiction listed on the property, you create a list of properties that currently do not have a tax jurisdiction to further review.
- To do this, go to the *Properties* module in the blue side menu.

- We'll be using the *Default* search list of Properties. Click the *Display* function.
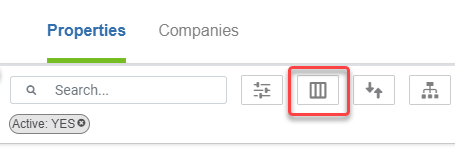
- The *Display* window will appear. Add *Tax Jurisdiction Name*.
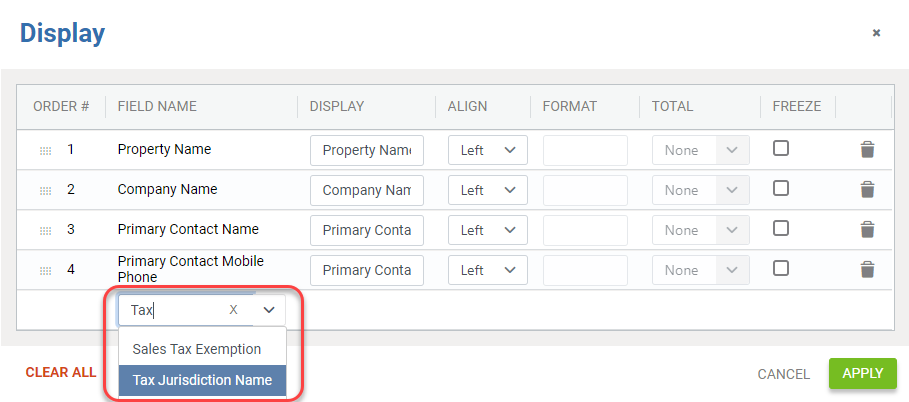
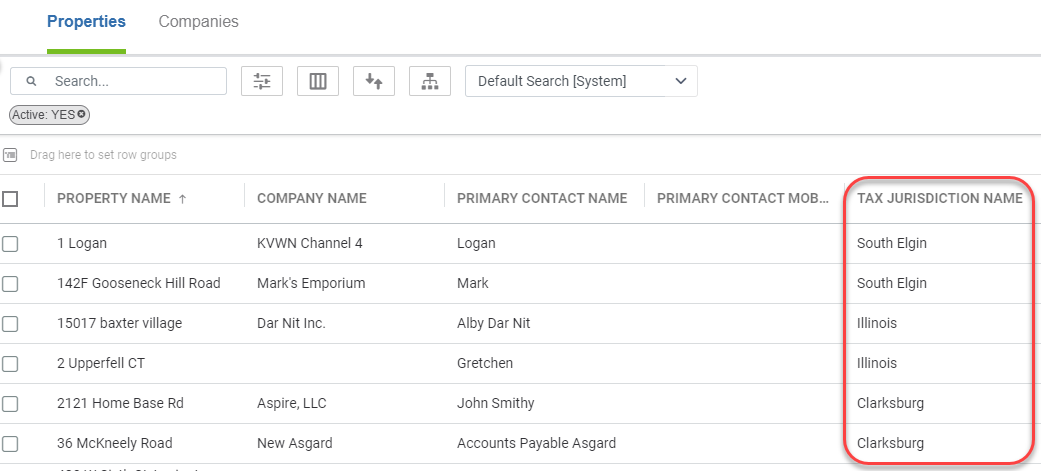
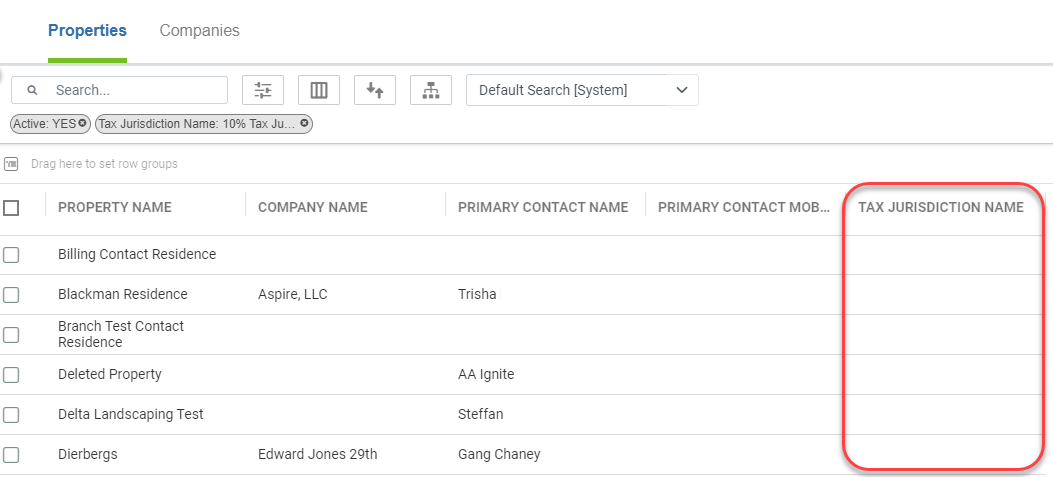
- Then, click *Apply*. The list will now display *Tax Jurisdiction Name* as a column. If the value is blank, this means that no *Tax Jurisdiction* has been added to the property.
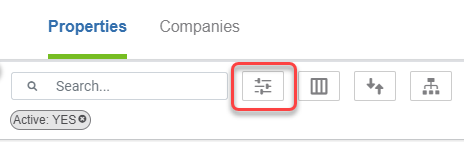
- To filter the list to only empty values, select the *Filter* icon.
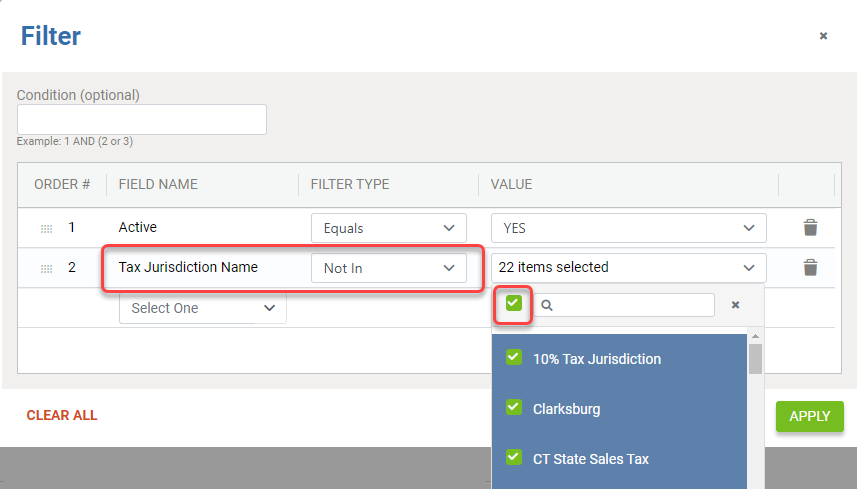
- The *Filter* window will appear. Add *Tax Jurisdiction Name*.
- For *Filter Type*, select *Not In*
- For *Value*, select all values using the checkbox at the top.
- Then, click *Apply*.
- You will now see all properties that do not have a *Tax Jurisdiction* applied to them for you to review and bulk assign!
Training Videos
[706 Administration - Setting Up Sales Tax Video](https://fast.wistia.net/embed/iframe/72uc8t525m?web_component=true&seo=true&videoFoam=false)