Overview - Advanced Search Save As
Each module (except Calendar and Scheduling) and the details screen in the Report module contains a search list with customizable search options to create and save granular search lists. Doing so enables you to re-apply the search groupings (filter, sort, display, and group) you have configured by selecting the list from the Search Lists drop-down menu to the right of the advanced search tools at the top of the screen. The search lists in the menu are organized into four categories: My Default, Created By Me, Shared With Me, and System.
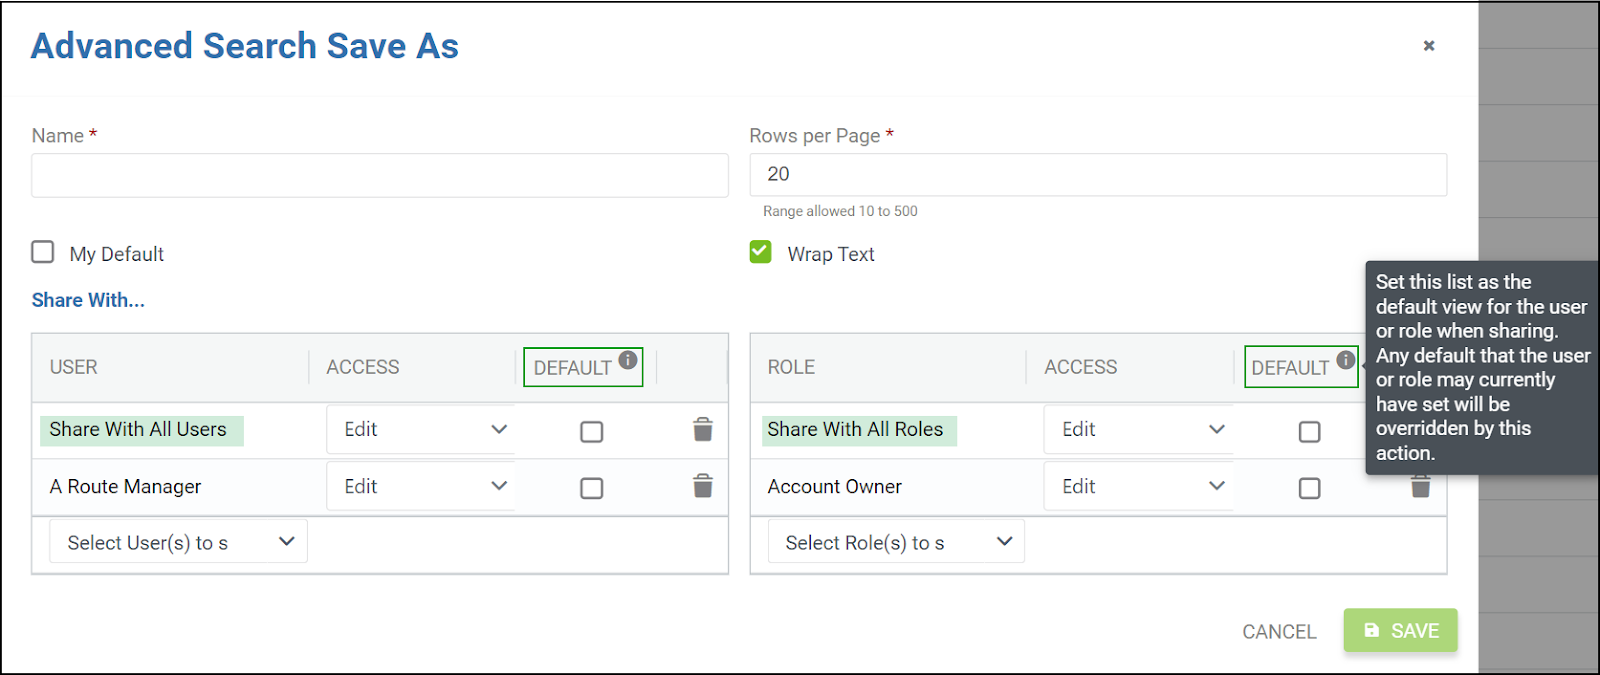
 When sharing a list, the Advanced Search Save As modal provides the option to grant or revoke individual users' ability to view or edit lists. System administrators can share lists with users and user roles, while users who are not system administrators can only share lists with users.

Admin Sharing Options
As an administrator, you can designate advanced search lists as default with specified users or roles using the new Default checkbox that will appear only for system admins after sharing an advanced search list. A new Shared With All option allows you to extend advanced search lists to all Users or Roles.
Keep in mind
- Once you share a list with all, the recipients cannot remove it, ensuring consistent visibility over who has been granted access.
- If you select Share With All Roles, the list will not be sent to users without an assigned role.
- The most recent selection overrides the previous list if you decide to share and default to another advanced search list with the same user or role.
- Checking Default will override the My Default advanced search list for any user or role you share with unless you have selected Share with All Users or Share with All Roles in which case the default option will not be available.
- If you remove the default shared list from a user or role, the user will see the default system list instead.
Creating an Advanced Search Save As List
To create and save an advanced search list, you must customize your search using the filter, display, sort, and group search functions and select Save As from the More menu. Remember that to save a new list, the search list field must be cleared out by clicking the X next to the drop-down arrow within the search list field.
 Otherwise, changes will be made to the named list in the drop-down menu.
 *1. Name - Create a Name to classify the list correctly.
*2. Rows per Page - Designate how many rows of results should populate on one page using the Rows Per Page field. Currently, the minimum amount is ten rows per page, and the maximum is 500 rows per page.
3. My Default - Select if you want the list to automatically populate when you navigate to the module or details screen where the list is located.
4. Wrap Text - Checkmark Wrap Text if the text within a row should fully appear instead of truncated within the row.
5. User - Choose users to whom to grant access.
6. Access - Choose user roles to which to grant access. As a system administrator, access can be granted to user roles.
7. Select User(s) - Choose a user(s) to share the list with.
8. Edit - Select the access type of Edit to enable you to view and make changes to the list.
9. View - Selec to allow view only for the list.
10. Delete - Click on the trash bin icon to revoke access to the list from a user.
11. Cancel - To abandon an unsaved list, click Cancel.
12. Save - Click Save after at least completing the required fields within the modal.
Editing an Advanced Search Save As List
To edit an existing list, you must first choose it from the search list field to the right of the search functions (filter, display, group, sort) by clicking the X within this field. The list that is currently appearing will then be cleared. After selecting the list to be modified, navigate to the More menu and choose Save As. The Advanced Search Save As modal will populate, and all fields can be adjusted.

Deleting an Advanced Search Save As List
Select the search list to be deleted from the search list drop-down. Then, go to the More menu and select Delete List. Lastly, Select Confirm once prompted.

Creating a dashboard metric from an advanced search
If you've saved your advanced search list and want to create a dashboard metric directly from it, you can do so without leaving the module:
- Apply your filters, display settings, grouping, and sort order.
- Save the search list if you haven’t already.
- Open the More menu and select Create Metric.
This opens the Create Metric modal:
- The Element Type and Selected Search fields are pre-filled and locked.
- Complete the remaining fields and click Save.
- After saving, the modal closes and you're returned to the search list screen.
The Create Metric option is only available when viewing a saved search list. It is disabled if the list hasn’t been saved yet. For more information, see the Metric Element screen.