Overview
Build your snow estimates on contract opportunities, with the services and invoice type that match how you sell snow work. This article walks you through estimating each kind of snow contract: seasonal, simple per occurrence, range billing per occurrence, and time and materials (T&M). It also shows you how to cap a seasonal service and switch to T&M billing once the cap is reached.
Not sure which billing arrangement you sell? For more information, visit Choosing a Snow Contract Invoice Type.
Things to know
Each billing arrangement uses one of three contract invoice types. Seasonal uses Fixed Payment, both per occurrence contracts use Per Service, and T&M uses T&M.
The invoice type you set on the opportunity applies to every service you add. One opportunity can hold more than one invoice type. For example, a seasonal opportunity can include As Needed T&M services for overage work. To change a service's invoice type, open its Service Details screen.
Seasonal services create their work tickets when you win the opportunity. Per Service and T&M services are marked As Needed, so Aspire creates a work ticket only when the work happens.
The opportunity's start and end dates control when tickets can be created. Set dates wide enough to cover early and late storms, such as September 1 through June 1. For more information, visit Structuring Snow Opportunities.
Multi-visit and Requires Approval come from the catalog service, not the estimate. Set them up before you estimate. For more information, visit Setting Up Snow Services.
Requirements
To view opportunities, you need the View Only My Opportunities or View Opportunities permission.
To create or edit opportunity estimates, you need the Edit My Opportunities or Edit All Opportunities permission.
To edit items on an estimate, you need the Edit Estimate Items permission.
Set up your snow services, kits, and pay codes first. For more information, visit Setting Up Snow Services and Setting Up Snow Pay Codes.
To cap seasonal services, select Enable Limiting Fixed Price Services in Administration > Configuration, on the Application tab. It can’t be turned off after you save it. For more information, visit Snow Administration and Configuration.
Video
This video walks through estimating each kind of snow contract from start to finish, including how to cap a seasonal service. To jump to a specific contract type, select its chapter marker in the video's progress bar.
Steps
Go to the section for the contract you're estimating. If you sell more than one kind, you can estimate several in one season. Keep snow on its own opportunity, separate from your green season work.
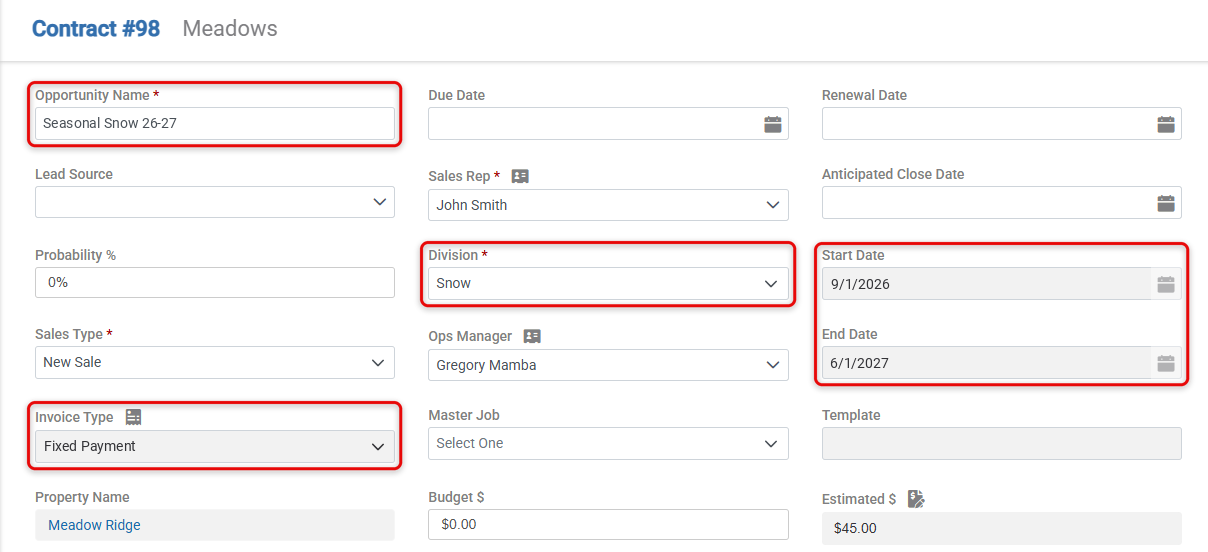
Every snow estimate starts the same way: a contract opportunity in the Snow division, with the right invoice type and dates that cover the whole season.
After that, the estimate differs by contract. Use this table to see what changes, then follow the steps for yours.
Setting | ||||
|---|---|---|---|---|
Invoice Type | Fixed Payment | Per Service | Per Service | T&M |
Services | Every service the season might need | One per type of work | One per depth range of each type of work | One per type of work |
As Needed | Not displayed | Select | Select | Select |
OCC | 1 for the season, or 1 per snow month | 1 | 1 | 1 |
Item quantities | What a typical season needs | 1 | 1 | What one delivery of the service needs |
Payment schedule | Yes | No. Bills each ticket. | No. Bills each ticket. | No. Bills each ticket. |
Estimate a seasonal snow contract
A seasonal contract bills the same payments across the season on a payment schedule, however much it snows. Each service gets a work ticket that stays open for the season, or one per month if you set it up that way, so seasonal services must use Multi-visit services from your service catalog.
From the property, create a contract opportunity.
Set Invoice Type to Fixed Payment.
Set Division to Snow.
Set the Start Date and End Date to cover the whole snow season.
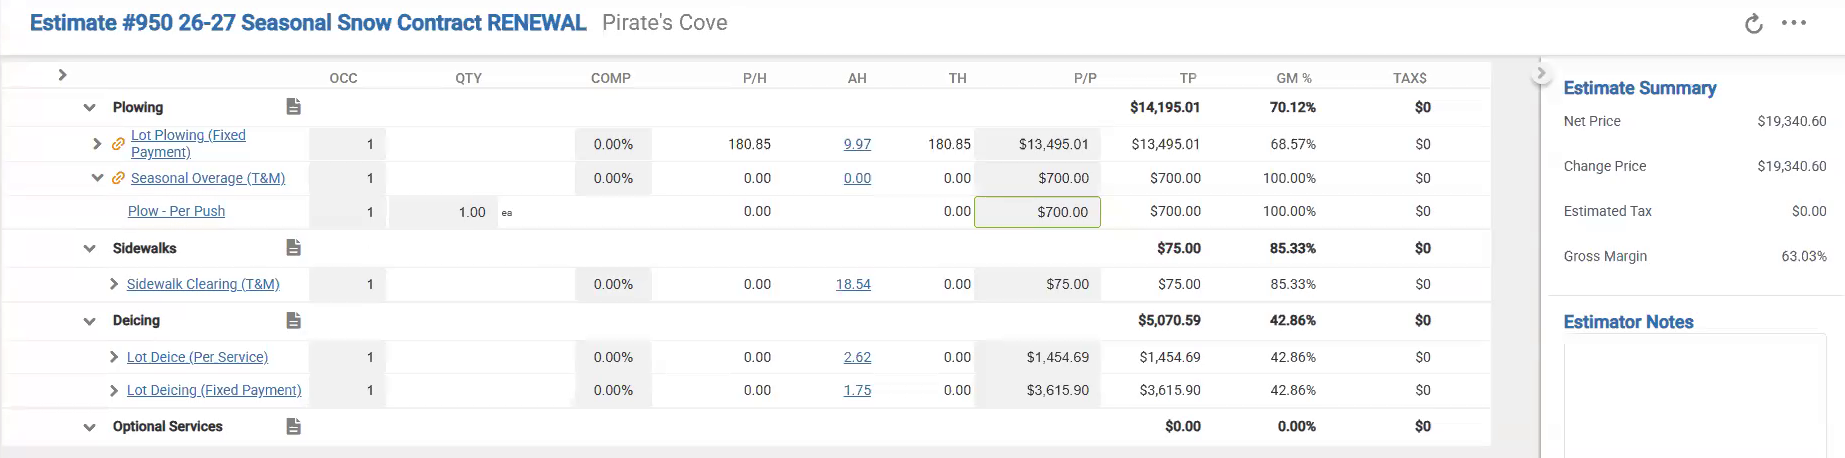
Select Create Estimate, and add every snow service the season might need, such as "SN - Lot Plowing FP".
Add the kits or items under each service. Enter quantities based on what a typical season brings. These quantities set the estimated price of the contract.
In the OCC column, enter the number of occurrences for each service.
For one ticket for the whole season, enter "1". Most companies use this setup.
For one ticket per month, enter one occurrence for each snow month, such as "7" for October through April. For more information, visit Structuring Snow Opportunities.
Optional: Select a service to open the Service Details screen, then enter Per Visit Hours and Per Visit Materials Qty. These set how long each scheduled visit takes and the default material quantities crews see. They display only for Multi-visit services in the Snow division.
Optional: Add As Needed services for work outside the seasonal price, such as overage, blizzard, or hauling work.
Select the service to open the Service Details screen.
Change its Invoice Type to T&M or Per Service.
Select As Needed, then select Save.
Select the Opportunity tab, then select Complete. The Payment Schedule window opens.
In Invoice on, select when invoices are created, such as First of the Month.
In the Month column, clear any months you won't bill.
Select Spread Evenly, or Spread and Round to round each payment to the nearest dollar.
Select Save. The opportunity moves to Approved, and you can send the proposal.
When your customer accepts, mark the opportunity Won.
Note: The payment schedule includes only Fixed Payment services. As Needed services on the same opportunity bill per ticket, once the ticket is complete and, if required, approved.
Tip: Set up the areas to be cleared as takeoffs on the property. Aspire fills those values into the estimate, so you don't enter them by hand. For more information, visit Creating Takeoffs in Aspire.
Estimate a simple per occurrence snow contract
A simple per occurrence contract, often called per push, bills one set price each time you perform a service, whatever the depth. You add one service for each type of work, such as plowing, shoveling, or deicing.
From the property, create a contract opportunity.
Set Invoice Type to Per Service.
Set Division to Snow.
Set the Start Date and End Date to cover the whole snow season.
Select Create Estimate, and add one service for each type of work you might perform.
Under each service, add the kit that matches the work, such as "SN - Lot Plowing".
Enter an occurrence of "1" and an item quantity of "1". This sets the price of one push.
Select the service to open the Service Details screen.
Select As Needed, then select Save.
Repeat steps 3 through 6 for each service.
Select the Opportunity tab, then send the proposal. When your customer accepts, mark the opportunity Won.
A heavier storm doesn't raise the price. Schedule more visits instead, which creates more billable tickets.
Estimate a range billing snow contract
Range billing works like simple per occurrence, except each visit is priced by snow depth. You add one service for each depth range of each type of work, such as "SN - Lot Plowing 0-2.99" and "SN - Lot Plowing 3-5.99". Aspire doesn't set the ranges for you, so use the ranges in your contracts.
From the property, create a contract opportunity with Invoice Type set to Per Service, Division set to Snow, and dates that cover the whole season.
Select Create Estimate, and add a service for each depth range of each type of work.
Under each service, add the kit for that depth. Kits hold the labor your crews need to clear the area at that depth.
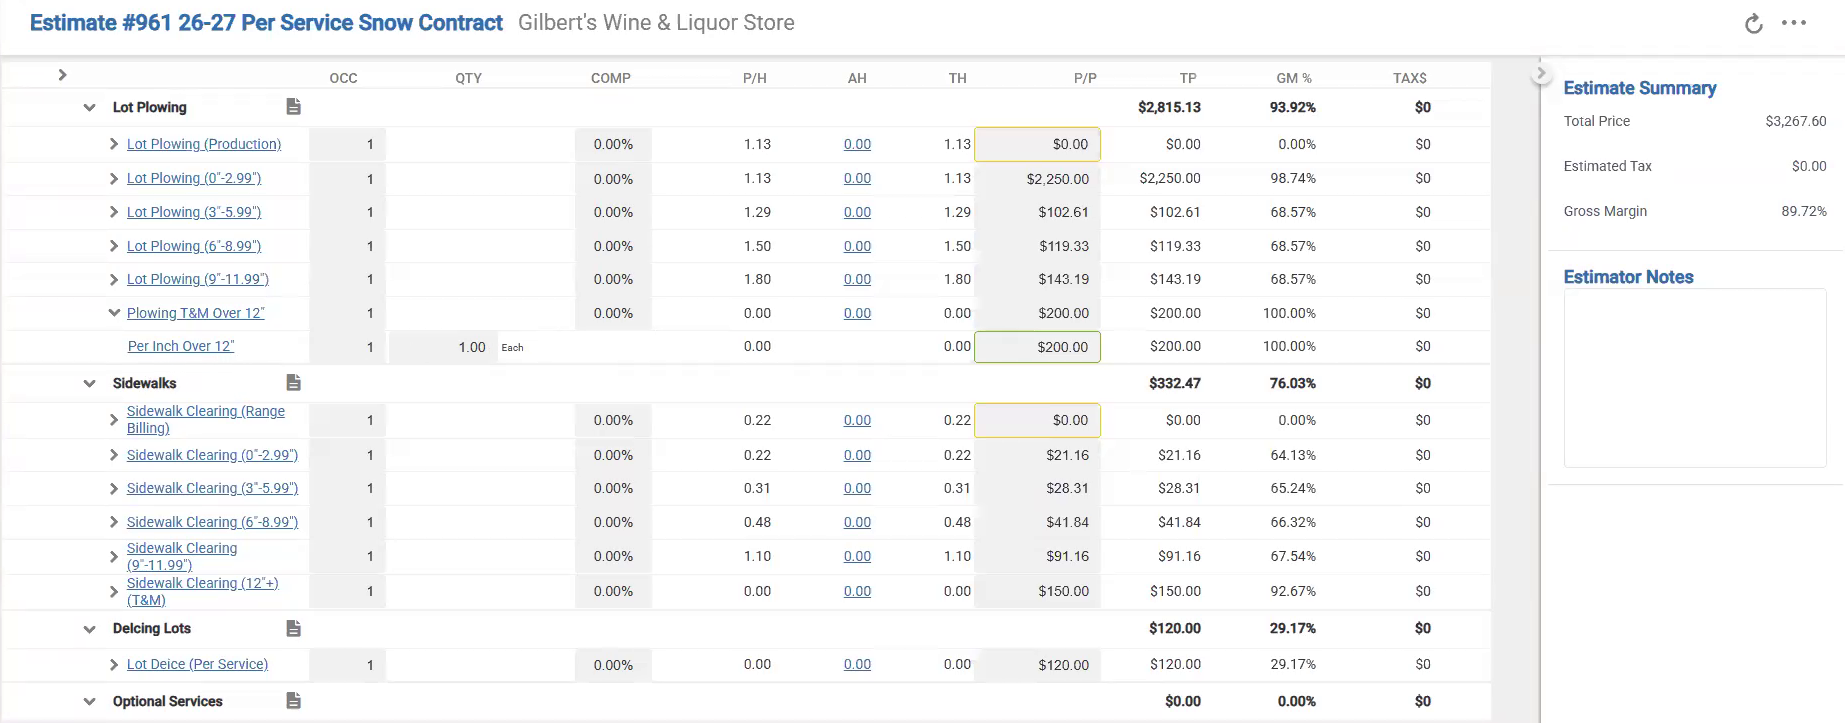
Enter an occurrence of "1" and an item quantity of "1" for each service.
Open each service's Service Details screen.
Select As Needed, then select Save.
Select the Opportunity tab, then send the proposal. When your customer accepts, mark the opportunity Won.
Important: If more snow fell than the ticket's depth range, you can swap the ticket to the right range any time before it's invoiced. If the ticket is already complete, uncomplete it first.
Tip: To review depths before tickets are completed, set your range billing services to Requires Approval in the service catalog. For more information, visit Setting Up Snow Services.
Estimate a T&M snow contract
A T&M contract bills the labor, equipment, and materials reported on each ticket. Add every service and item you might bill for, because crews and subcontractors can only report against what's on the estimate.
Set up the equipment and materials your crews use in the item catalog. Mark materials Inventory Item and Available to bid. Select Allocate from Mobile on $0 equipment items and on materials your subcontractors supply. Without these settings, crews and subcontractors can't report the item from a device.
From the property, create a contract opportunity.
Set Invoice Type to T&M.
Set Division to Snow.
Set the Start Date and End Date to cover the whole snow season.
Select Create Estimate, and add a service for each type of work you might perform.
Under each service, add the equipment, labor, and material items. Enter quantities for one delivery of the service.
Enter an occurrence of "1" for each service.
Open each service's Service Details screen.
Select As Needed, then select Save.
Select the Opportunity tab, then send the proposal. When your customer accepts, mark the opportunity Won.
Important: We don't recommend minimum charges or minimum hours on snow T&M services. If a ticket doesn't reach the minimum, the invoice shows a T&M minimum line that you can't change.
You usually don't need the Pricing Table on snow T&M services. Without it, Aspire prices each ticket like this:
Labor bills at the T&M Labor Price.
Items bill at the price override on the estimate, if there is one. Price overrides only apply to items you add to the service on their own, not to items inside a kit. Override the price, not the cost. Otherwise, they bill at the item's catalog Price Override, or at its catalog cost plus the T&M material markup on the service.
Markups set in Administration don't apply.
Subcontractor costs on Snow division services aren't calculated on T&M invoices.
Keep your catalog prices up to date. For more information, visit T&M Pricing Hierarchy.
What you estimate and what crews use will differ, and that's expected. The estimate sets what can be reported and how it's priced. The ticket records what actually happened.
Cap a seasonal service and link a T&M service
A heavy winter means more visits for the same seasonal price. You can cap a seasonal service by visit count or by date, and link it to an As Needed T&M service. Once the cap is reached, more work bills at your T&M rate.
Open a seasonal estimate that has both your Fixed Payment services and the As Needed T&M services you might need.
Select a Fixed Payment service to open the Service Details screen.
In the Limit Fixed Price Services section, limit the service by Visits or by Contract End Date. Choose one.
If you limited by visits, enter the maximum number of visits.
In the Switch To column, select the As Needed T&M service that takes over when the limit is reached. The Switch To column only displays if the estimate already has an As Needed T&M service. To cap the service without switching to T&M, leave Switch To blank.
Select Save.
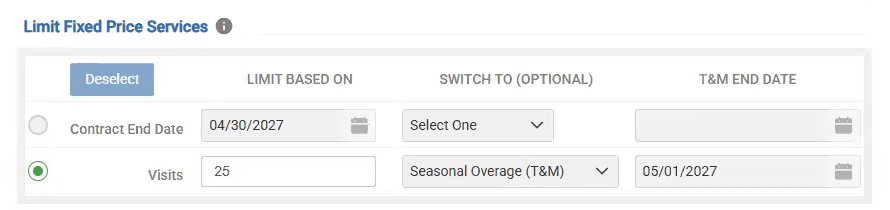
Note: OCC and the visit limit are separate settings. OCC sets how many work tickets the service creates, and the visit limit caps visits. If you use one ticket per month, test a capped opportunity before you send proposals to confirm the limit works the way you expect.
An orange link icon displays next to each capped seasonal service and the T&M service it's linked to. Select the icon to see the name of the linked service.
The following diagram shows what happens to new visits once the limit is reached.
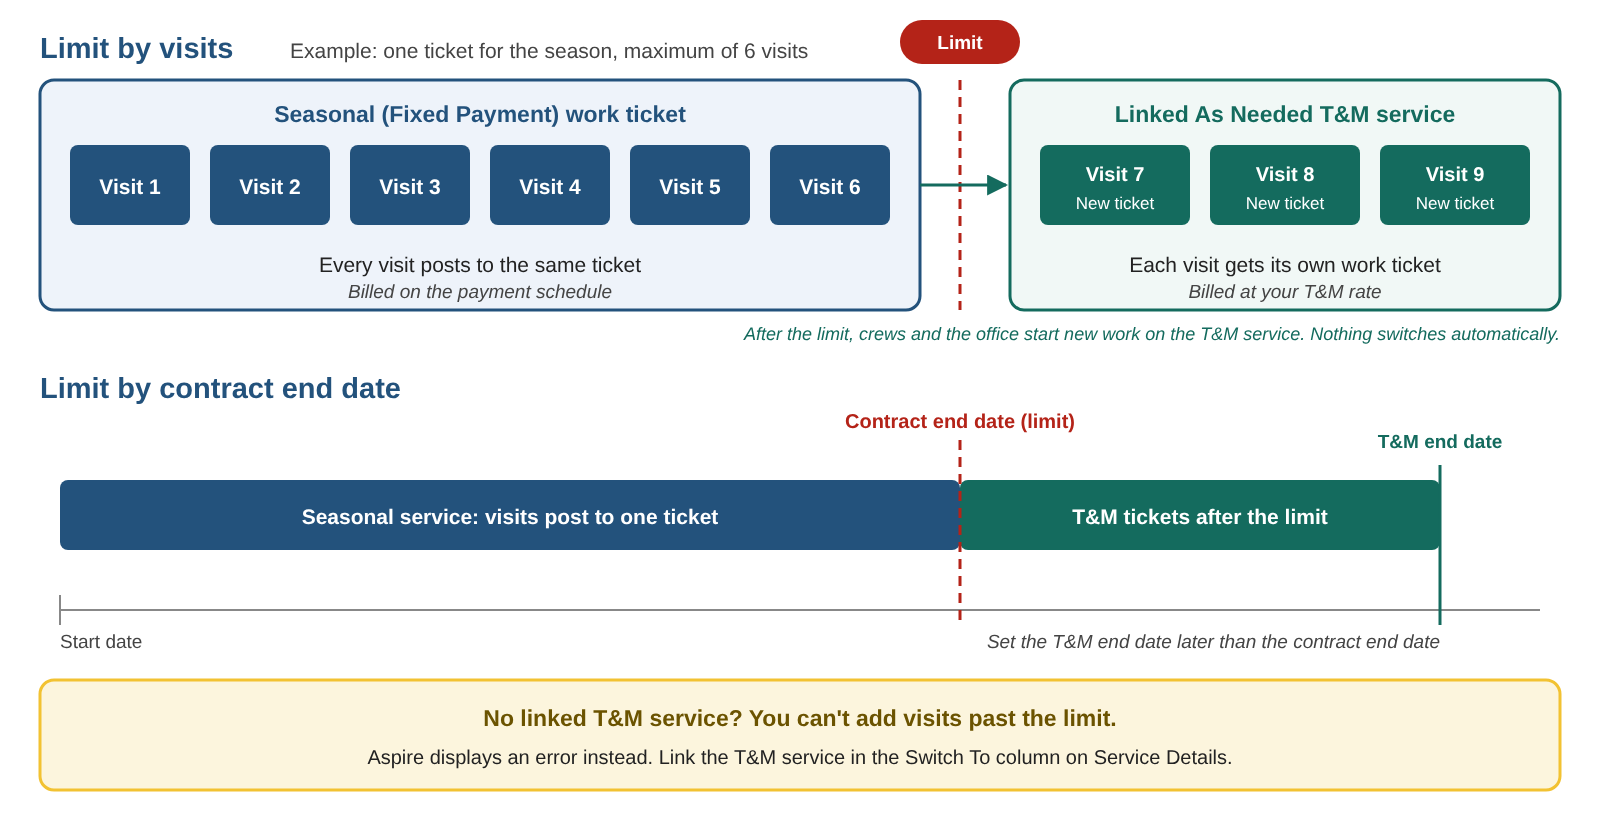
Important: If you limit by Contract End Date, the cap uses the opportunity's end date. Give the linked T&M service an end date at least one day later, or the T&M service expires as soon as it becomes available. You can't extend the opportunity's end date after it's won, so set both dates before you win the opportunity. Contact Aspire Support if you need to extend it.
Once the visits are used or the contract end date passes, a message displays on the Schedule Board when you schedule that opportunity's tickets, letting you know you can now add T&M tickets. If the service has no linked T&M service, you get an error instead when you try to create more visits.
Count several visits as one
If several routes visit one property for the same storm, you can count it as a single visit.
On the Schedule Board, select the visit placard you don't want to count.
Select the three-dot icon to open the action menu, then select Edit Visit.
Select Ignore Multi Visit Service Limit, then select Save.
Note: Visits you create from an ignored visit are ignored too, including visits you add by extending the placard or from the Visit Details screen.
How visits count toward a limit
Visits past midnight: A visit that starts before midnight and runs past it counts as one visit.
Deleted placards: A visit placard deleted from the Schedule Board doesn't count, even if someone deleted it by accident, unless you re-create it.
Linked service type: A capped service can only link to an As Needed T&M service, not a Per Service service. For per-push pricing after the cap, add a "Plow per push" item at your push price to the T&M service.
Before the cap: The office can schedule the linked T&M service at any point in the contract. Aspire Mobile and the Subcontractor Portal hide it from crews and subcontractors until the cap is reached or the contract end date passes, unless the office schedules it.
After the cap in Aspire Mobile: Once a ticket reaches its visit limit, crews can't start new visits on it in Aspire Mobile, and a message tells them the limit is exceeded. The linked T&M service then displays in Aspire Mobile, and crews start work on it instead. Visits the office already scheduled aren't blocked.
Scheduling after the cap: Once a service reaches its limit, schedule new work on its linked T&M service.
What happens next
When you win a seasonal opportunity, Aspire creates the work tickets for each Fixed Payment service. Per Service and T&M services wait until you schedule an event or crews pull work.
Schedule work when a storm is forecast. For more information, visit Scheduling a Snow Event or Making Snow Work Available by Route.
If subcontractors do the work, add subcontractor auto expenses from each service's Service Details screen. On seasonal services, auto expenses need the catalog service marked Multi-visit. For more information, visit Understanding Multi-Visit Snow Services.
After each storm, review Per Service and T&M tickets in Pending Approval, swap depth ranges, and override T&M prices when needed. For more information, visit Reviewing Snow Work Tickets Pending Approval.
Troubleshooting
For help with common estimating problems, such as a missing As Needed option or a heavy winter eating your seasonal margin, visit Snow Troubleshooting.