Overview
Before your first snow event, a system administrator needs to check a handful of settings in Administration that control how Aspire recognizes snow work, what your crews and subcontractors can do in the field, and how snow contracts behave. This article walks you through each of those settings, where to find them, and when to turn them on.
Most of these settings are set once and left alone. Review them at the start of each season, especially if your team has changed how it works with subcontractors.
Things to know
Settings on Administration > Configuration apply to your whole company. Some time reporting settings can also be changed for a single branch.
Enable Limiting Fixed Price Services can't be turned off once you save it. Read the caution in the steps before you turn it on.
Requirements
To change settings on Administration > Configuration, Administration > Application > Lists, and the Time Reporting section of a branch, users must have the System Admin permission. Branch administrators with Enhance Branch Admin Security turned on can only edit the Invoicing section of the Branch screen.
Video
Steps
Work through these sections in order. Each one builds on the one before it.
Confirm the snow list values
Start with your lists, because your services, items, and routes all point back to them.
Go to Administration > Application > Lists.
In the list dropdown, select Division, then confirm a division named "Snow" exists.
If it doesn't, add it. If it's named something else, such as "Snow Removal," rename it to "Snow."
Select Service Type, then confirm at least one service type belongs to the Snow division. Services get their division from their service type.
Select Catalog Item Category, then confirm at least one category name contains the word "snow," such as "Snow" or "Snow Materials."
Select Save after any change.
Check your snow services and items
Your snow services and catalog items need to use the list values you just confirmed.
In Administration > Estimating > Service Catalog, open each snow service and check the Service Type field. Each option shows the division first, then the service type, such as Snow | Snow or Snow | Plowing. Select an option that starts with Snow. That's what puts the service in the Snow division, which Snow Mode needs. The service type name after the division can be anything.
While you're on the Service screen, confirm each service has the right Contract Service, Requires Approval, Multi-visit, and Default Pay Code settings. For more information, visit Setting Up Snow Services.

In Administration > Estimating > Item Catalog, each snow material, equipment item, and kit should use an item category whose name contains "snow," such as "Snow" or "Snow Materials." Without it, crew leaders can't find the item in Aspire Mobile while Snow Mode is on.
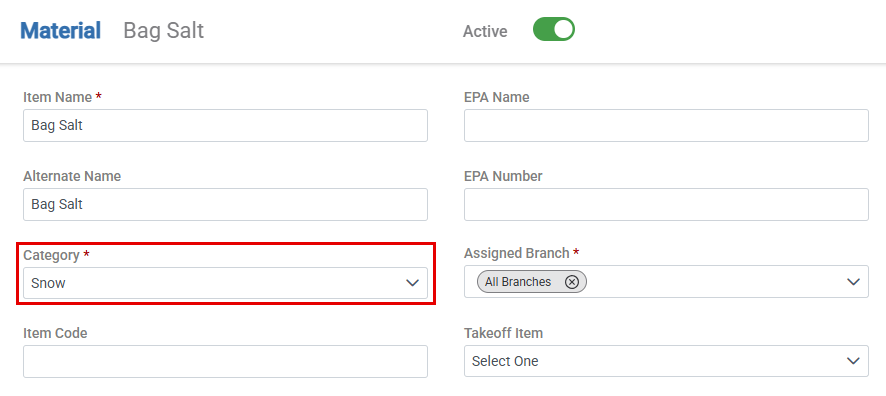
Tip: Build snow kits now, before you estimate. A kit can carry a takeoff value and a production factor, so one kit, such as a 0–2.99 inch lot plowing kit, prices every occurrence consistently. Set the kit's Unit Type, and the Factor for each item in the kit. If the kit uses a takeoff, its unit type must match the takeoff's unit type. For more information, visit Creating a Kit for the Item Catalog.
Set the snow options on the Application tab
Go to Administration > Configuration, then open the Application tab.
When you're ready for the season to start, turn on Enable Snow Mode in the Mobile section. This lets crew leaders turn on Snow Mode in Aspire Mobile, which hides non-snow services, items, and routes. For more information, visit Turning On Snow Mode.
Optional: If you sell seasonal contracts that cap the number of visits or end on a set date, select Enable Limiting Fixed Price Services. This lets you limit a Fixed Payment service and switch to a linked T&M service once the limit is reached.
Select Save. If you selected Enable Limiting Fixed Price Services, select Confirm when prompted.
Caution: Once you save Enable Limiting Fixed Price Services, you can't turn it off. Select it only if your company plans to use service limits. For more information, visit Estimating Snow Contracts.
Choose your time reporting settings
The Time Reporting tab controls what your in-house crews and subcontractors can do when they report snow work. Go to Administration > Configuration, open the Time Reporting tab, review the following settings, and then select Save.
Subcontractors can report work in Aspire Mobile, in the Subcontractor Portal, or both. We recommend Aspire Mobile for subcontractors. You can let different subcontractors use different tools, or let the same subcontractor use both. Turn on the settings that match how your subcontractors work.
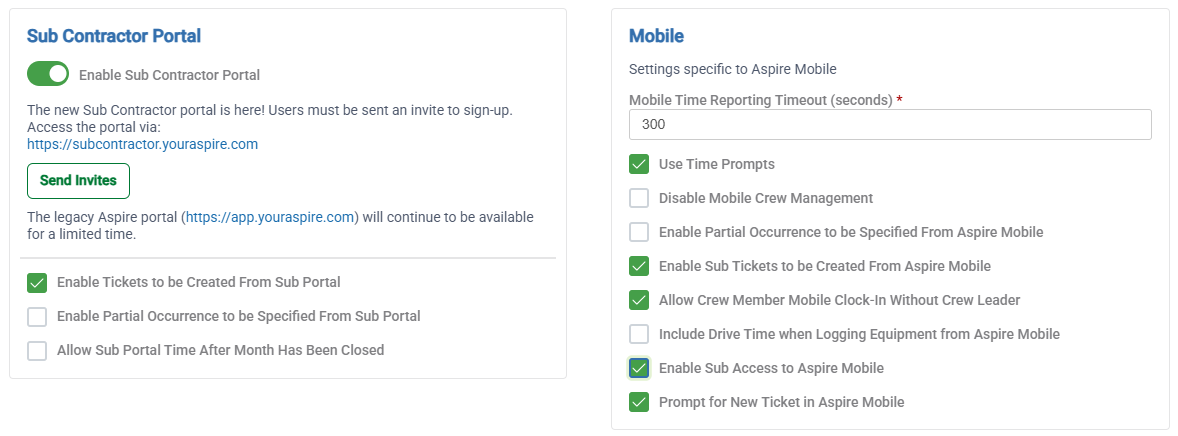
Aspire Mobile settings
Setting | What it does | Turn it on when |
|---|---|---|
Enable Sub Access to Aspire Mobile | Lets subcontractor contacts without a user record log in to Aspire Mobile. Sub contacts with a user record can log in either way. | Subcontractors report work in Aspire Mobile instead of, or as well as, the portal. |
Enable Sub tickets to be created from Aspire Mobile | Lets subcontractors create work tickets from As Needed services in Aspire Mobile. When it's off, they can still add time to unscheduled work tickets that already exist. Subs only see services with an auto expense for their company on the opportunity service. | You don't schedule subcontractor work ahead of each event. |
Enable Partial Occurrence to be Specified From Aspire Mobile | Adds a Partial Occurrence button to the Work Ticket screen in Aspire Mobile so crew leaders and subcontractors can enter what percentage of the expected effort a visit needed. The value is guidance for office staff. It doesn't change the price. | You bill some Per Service occurrences at a percentage. |
Include drive time when logging equipment from Aspire Mobile | Adds drive time to equipment hours when office staff accept time, so drive time is charged at equipment rates instead of labor rates. The route must also have Allow Equipment Time Reporting turned on. | You sell a lot of T&M snow work and bill plow trucks or loaders by the hour. |
Subcontractor Portal settings
Setting | What it does | Turn it on when |
|---|---|---|
Enable Sub Contractor Portal | Turns on the Subcontractor Portal. Subcontractors need an invite to sign up. The legacy portal stays available for a limited time. | Any subcontractor reports work in the portal. For setup steps, visit Setting Up Snow Subcontractors. |
Enable Tickets to be Created From Sub Portal | Lets subcontractors create work tickets for services that aren't scheduled on the Schedule Board. | You don't schedule subcontractor work ahead of each event and want them to create tickets from As Needed services. |
Enable Partial Occurrence to be Specified From Sub Portal | Adds a Partial Occurrence icon to the portal's Work Ticket screen so subcontractors can enter what percentage of the expected effort a visit needed. The value guides office staff when they set the partial occurrence on the work ticket. | You bill some Per Service occurrences at a percentage, such as 50%. |
Allow Sub Portal Time After Month Has Been Closed | Lets subcontractors enter hours for a closed month. They enter total hours worked rather than start and stop times. | Subcontractors routinely submit late time and you'd rather capture it than reopen the month. |
Change a setting for one branch
If one branch needs to work differently from the rest of your company, you can override some time reporting settings for that branch only.
Go to Administration > Organization > Branches, then select the branch.
Scroll to the Time Reporting section.
Change the setting you want to override. Settings that follow your company-wide choice display Use System Setting.
Select Save.
What happens next
Your snow services, items, and routes now display correctly in Aspire Mobile when a crew leader turns on Snow Mode.
Next, set up your snow pay codes and services, then your routes and subcontractors. For the full setup order, visit Snow Season Overview.
Before you send proposals, test one opportunity of each kind of snow contract you sell through to invoicing to confirm your settings work the way you expect.
Troubleshooting
For help with common snow setup problems, such as services or items not displaying in Snow Mode, visit Snow Troubleshooting.