The Application Configuration screen allows you to establish Aspire system parameters that define the overall behavior of Aspire for your company, such as fiscal year start, revenue reporting model (earned or invoiced), timezone, company info such as name and website, time reporting information, invoicing setup and accounting synchronization to name a few. It is available from the Application Configuration option on the Administration screen.
The Application Configuration screen is comprised of tabs that organize the available system-wide parameters:
- Application
- Accounting sync
- Aspire GPS integration
- Company
- Customer Portal 1.0
- Customer Portal 2.0
- Electronic payments
- Electronic signature
- Invoicing
- Time reporting
Application
The Application tab allows you to define Aspire's operating parameters. Most values will be established when they initially configure the system and remain static thereafter. The Snow Mode check box is a notable exception, which some companies change annually.

Each of the screen elements on the Application tab of the Application Configuration screen is described below.
Add new reading
This option affects the default behavior of the AddNew Reading check box on the New Service Log screen. If this Add New Reading option in Admin is selected, the Add New Reading check box on the New Service Log screen is enabled by default. Otherwise, it is disabled by default. In either case, you can change the value of the Add New Reading check box on the New Service Log screen.
Auto approve device
This box modifies the behavior of device authorization. If this box is selected and a user enters a valid user name and password on a device that has never been used before, the device will automatically be authorized, and you can log in without intervention by a system administrator.
Create property from contact
If this option is enabled, Aspire will add an icon to the bottom of the Contact screen that, when clicked, initiates the creation of an associated property.
Crew leader role
Specify which security role is properly configured for crew leaders in the organization. To work properly, the selected security role must at least have the Crew Leader Permission selected.
Attachment size
This option allows you to specify the default image size (Small, Medium, Large, or Actual Size) to be initially selected when a user adds an image to a property, opportunity, issue, etc. You can override the default each time they save an image—this option sets the default.
Default division for work orders
You can specify the division by default when creating new work orders. You can override the default rule when creating a work order.
Default schedule of values to % vs dollars
This check box is interpreted as follows:
- Selected: When creating a work order with the invoice type of Fixed Price Open Billing, the default schedule of values generated by Aspire will be linked to the service so that when you generate an invoice, they will specify the portion to invoice by the percentage of service cost.
- Clear: When creating a work order with invoice type of Fixed Price Open Billing, the default schedule of values generated by Aspire will be defined so that when you generate an invoice, they will specify the portion to invoice by dollars to the invoice.
Either way, you can modify the default schedule of values for the work order before winning the opportunity. For example, you can specify the schedule of values based on the number of items installed.
Enable negative schedule of value lines
This option determines how Aspire users must apply negative changes (i.e., removal of materials or labor) from a work order using a change order for Fixed Price Open Billing work orders.
Schedule of values (SOV) display grouping
Choose how Aspire organizes the Schedule of Values: by Estimate Headers or Service Type. Select Estimate Headers to automatically include the estimate's groupings, preserving the group and service names. Choose By Service Type to display services with individual work tickets separately on the SOV, making them easily identifiable. Aspire will add unique identifiers only when needed.
Auto-save master schedule of values file as an attachment upon winning work order
When selected, Aspire will auto-save the Master of Schedule of Values file as an attachment for easy access upon winning a work order.
Defaults for formatted fields
Required. Default font and font size used in formatted fields throughout Aspire. Examples of formatted fields include the Proposal Descriptions and Invoice Notes fields on the Opportunity screen.
Disable automatic ticket approval
Normally, if a team member who is the account owner on the associated property completes a work ticket that requires approval, the ticket status automatically goes from Scheduled to Complete, skipping the Pending Approval status. When the Disable Automatic Ticket Approval check box is checked, automatic approval is disabled, meaning that the Pending Approval status will not be skipped in this case. Even the account owner must explicitly approve the work ticket by choosing the Approve option before it will advance to Complete status.
Display tax on estimate
This option determines whether the tax amount is shown on the Estimate screen based on the tax percent for the associated property's tax jurisdiction. If the option is selected, tax is only shown for opportunities where the estimate has been marked complete.
Enable LandscapeHub integration
Aspire integrates with LandscapeHub–a web-based marketplace for plants and landscape supplies–to streamline material acquisition. This permission lets you access the Submit to LandscapeHub option on the Purchase Receipt screen in the Actions menu if you have the Submit Receipt to LandscapeHub permission enabled.
Enable SiteOne price book integration
Aspire provides integration with SiteOne– a hub for purchasing grounds maintenance materials. Before setting up SiteOne in Aspire, a SiteOne account must be established. This permission allows the feature to tell Aspire to perform daily updates of the Aspire Item Catalog products and pricing from SiteOne. These items are available when adding items to an estimate from the Aspire Estimating screen. When this permission is selected, it is also necessary to configure each branch to specify the materials that should be loaded for the branch.
Enable Weathermatic integration
Weathermatic is a third party that provides smart property watering solutions, including watering systems. These systems provide remote management of watering systems from computers and mobile devices. Aspire provides an interface to Weathermatic by property. After Weathermatic is selected, Aspire provides direct access to the Weathermatic website for the property represented on the screen in the following locations:
- The Properties screen in the Aspire Desktop Application
- The Work Ticket screen in Crew Mobile
Enhance branch admin security
For larger companies with many branches and larger infrastructure, this permission allows the distribution of greater responsibility to branch managers while properly enforcing limitations to branches they are authorized to manage, as described below.
Enhance branch admin administration security provides enhanced edit capabilities for branch administrators. This capability is especially useful for large organizations with many branches.
When the Enhance branch admin administration security check box is selected, you will have specified management capabilities under the following Administration sections if you have Branch Admin permission but do not also have System Admin permission:
- User Management
- Users
- Estimating
- Optional service tool
- Item catalog
- Workflows
- Price mark-ups
- Organization
- Branches
The functions associated with those icons are limited based on the branch administrator’s branch access as described below:
- Manage users
As a branch administrator, you can only view or edit users from the Users Search List screen for users whose contact is assigned to a branch to which the branch administrator has access as specified in the Branch Access field on the User tab of the User screen. You can add new user accounts. When adding or editing user accounts, you can only provide branch access for branches to which they have access. Additionally, you cannot assign any security role that includes the System Admin permission.
- Manage services
As a branch administrator, you can locate and view any service in the Service Search List screen, regardless of branch access. However, you will have read-only access, which prevents you from editing services assigned to branches to which you have no access. The Bulk Actions menu with the Set Completion Form action will not be available.
When adding new services, you can only add branches to which they have access. When adding services to an estimate, only services assigned to branches for which they have access will be available.
In search lists throughout Aspire, service drop-downs only allow the selection of services to which you have branch access, including services that provide access to all branches.
- Manage items
Enabling Enhanced Branch Admin Security allows specific branches to be associated with items in the item catalog.
As a branch administrator, you can view all items on the Items Search List screen regardless of their branch access. However, they have read-only access, preventing them from editing items assigned to branches to which you have no access, except that you can add or edit an allocation item cost to price lists set up on the branches to which they have access. The Bulk Actions menu3 is unavailable to branch administrators at the bottom of the Item Search List screen unless you also have System Admin permission.
If you do not have the System Admin permission or All Branch access, the Assigned Branch field is required when adding a new item or kit. The only branches that are available are the branches that you have access to. If you are adding a kit and are required to set the Assigned Branch field, then the available items to add to the kit are items where the Assigned Branch field is null or matches the assigned branch on the current item.
In search lists throughout Aspire, item drop-downs allow you to select only items to which you have branch access, including items that provide access to all branches.
- Manage workflows
As a branch administrator, you can only view or edit workflows on the Work Flows Search List screen to which you have branch access as specified in the Branch Access field on the User tab of the User screen. You can add new workflows, but only for branches to which they have access.
- Manage pricing
As a branch administrator, you can only view or edit price settings on the Pricing Settings screen to which you have branch access as specified in the Branch Access field on the User tab of the User screen. You can add new price settings but must specify a branch you can access.
- Manage branches
As a branch administrator, you can only view or edit branches on the Branches Search List screen to which you have branch access as specified in the Branch Access field on the User tab of the User screen. You can not add new branches.
You can only edit information on the Invoicing taba on the Branch screen. All other information on the Branch screen is read-only.
Fiscal start
Allows you to specify the month your company’s fiscal year begins. The drop-down menu lets you choose the appropriate month.
Hide schedule progress bar
If checked, it prevents the work ticket progress bar from displaying on visit tiles on the Scheduling Board screen.
Login type
Read-only. Aspire provides the value displayed here during the initial system configuration.
Device Expiration Interval (1 - 30 Days)
System administrators must configure a rolling expiration interval for inactive users to enhance device security. By default, this interval is set to 30 days, but administrators can customize it as needed within the 1-30 day range. Aspire automatically extends the user’s session with each login. If a user has not signed in within the configured number of days, the device is considered expired, and the user will be required to sign in again with their email and password.
Opportunity branch override
Check box. When selected, it displays a branch override field on the opportunity so you can give the revenue and expense to a branch other than the branch where the property is currently assigned.
Require contract end date
This option determines whether open-ended contracts are allowed. If this option is selected, all contracts must have an end date specified before being saved. Requiring contract end dates is considered an Aspire best practice because establishing a new contract each year reduces the complexity introduced by using contract changes to update contract terms over multiple years.
Require Opportunity Lost Reason
Check box. Select this option to require users to choose a predefined reason from the Opportunity Lost Reason list when marking an opportunity as lost. Aspire stores the selected reason for reporting and auditing. The Lost Reason Note field remains available for optional comments.
Require no open invoices check when changing jurisdiction
This option affects Aspire’s behavior of validation when you change the tax jurisdiction for a property on the Property screen. If enabled, an additional check determines whether there are any unpaid invoices for the property and, if so, prevents you from changing the tax jurisdiction. If the check blocks the change to the tax jurisdiction, Aspire displays the following message: “There are one or more unpaid invoices for this property. To change the property's jurisdiction, those invoices must be deleted before the jurisdiction can change. This will prevent taxable dollars from changing jurisdictions.”
Require unique vendor invoice #
When specifying the vendor invoice number on a purchase receipt, ensure you do not enter the same vendor invoice number for the same vendor on two different purchase receipts. This can help prevent duplicate purchase receipts or apply two different ones to the same invoice.
Restrict editing of employees
This option should only be enabled for companies that manage employee information in a separate system integrated with Aspire. Selecting this option prevents all users from editing information for employee contacts. The expectation is that such modifications will be performed in the alternate system, and changes will be automatically loaded into Aspire.
Restrict mobile route visibility to assigned routes
Enabling this option prevents crew leaders from viewing unassigned routes in Aspire Mobile. This applies to all crew leaders, but you can override this for specific users in the User Management screen.
Revenue reporting
This field previously allowed you to specify the default behavior of the P&L reports, whether they are based on earned or invoiced revenue. As of Aspire V5.0, this parameter has no known function.
Schedule month view display cap
Required. Specifies the maximum number of visit tiles to display in any cell on the Month view of the Schedule Board screen. If more visits are available on any given day than what is displayed, Aspire displays ellipses to indicate additional visits. Users must specify a value greater than zero.
Settings for the enable negative schedule of value lines
- Unchecked - You must use a special Negative Schedule of Values option available in the footer of the Schedule of Values screen to subtract negative values from the existing schedule of values entries using the Add Negative Schedule of Values screen.
- Checked - You must account for negative change orders by adding a new Schedule of Value line with a negative value. When this option is selected, the Negative Schedule of Values option is not available in the footer of the Schedule of Values screen. There is no special screen necessary for this option. You can add a schedule of value lines with negative values. Later, on the Master Schedule of Values screen, you can readjust the schedule of values lines as desired for any dollar amounts that have not yet been invoiced.
Show gross margin less sub
If selected, Aspire calculates Gross Margin on the Estimate screen without subcontractor cost as follows:
Net Gross Margin (%) = (Total Rev - (Labor Cost + Material Cost + Equipment Cost + Other Cost + Sub Cost)) / (Total Rev – Sub Cost)
This compares with the standard gross margin formula:
Net Gross Margin (%) = (Total Rev - (Labor Cost + Material Cost + Equipment Cost + Other Cost + Sub Cost)) / (Total Rev)
When this option is set, the new calculation is reflected in the following areas:
- Totals on the Estimate screen (“Less Sub” is added to the label for Gross Margin to reflect the modified calculation) as shown.
- Opportunity search list
- Pricing worksheet
- When adjusting the price on an estimate
- Job report
- P&L report

- Over/Under drill-down (change Gross Margin %)
- Gross Margin on Property screen
Show only gross margin on Estimating screen
This check box determines how totals are displayed on the Estimate screen for opportunities. The two display formats are depicted below.
 Unchecked
 Checked
Snow mode
Check box. Choosing this option places Aspire into Snow Mode to improve the operational efficiency of crew members during the winter season by providing a check box on the login screen of the Crew Mobile app, which, when selected by the crew leader, causes Aspire to hide non-snow services and inventory items on the mobile device.
Start revenue variance adjustment after
This field lets you specify the date after which Aspire will begin to adjust the reported variance between earned revenue and invoiced revenue as reported in the over/under values of the End of Month Report. Revenue variance adjustment and setup of this capability are explained more fully in the article, Revenue Variance.
Time zone
This field allows you to specify the time zone of the company’s primary location. Time zones for branch locations can be specified independently for the branches on the Basic Details tab of the Branch screen.
Accounting sync
The Accounting sync tab is used for the initial setup with Aspire to integrate with the accounting system. An Aspire account manager will guide you through this process. The screen layout differs depending on the accounting system with which Aspire is being integrated. Accounting systems supported as of this writing include:
- QuickBooks Online
- QuickBooks Desktop
- Acumatica
- Great Plains
- Net Suite
The Accounting Sync taba for each accounting system provides a check box at the top, Perform Accounting Integration at Branch Levelb. Selecting this check box makes all the account fields for the selected accounting system available on the Branch screen so that sync accounts can be set up for each branch.
Accounting sync tab for QuickBooks Online
The following image depicts how the Accounting sync tab is laid out when the QuickBooks Online option is selected in the Integrate with external accounting at system level field.

Enabling inventory as an expense
An option is provided to specify that inventory should be treated as an expense. When this option is selected, the month-end expense export to Excel will include direct job costs and inventory purchases. Additionally, the behavior of the Purchase Receipt screen changes.
Enable inventory as expensea is available on the Accounting sync tab of the Application configuration screen, as depicted below. The option is only available when the Enable EOM export optionb is selected.

Accounting sync tab for QuickBooks Desktop
The following image depicts how the Accounting sync tab is laid out when the QuickBooks Desktop option is selected in the Integrate with external accounting at system level field.

Accounting sync tab for Acumatica
The following image depicts how the Accounting sync tab is laid out when the Acumatica option is selected in the Integrate with external accounting at system level field.

Accounting sync tab for Great Plains
The following image depicts how the Accounting sync tab is laid out when the Great Plains option is selected in the Integrate with external accounting at system level field.
 Accounting sync tab for Net Suite
The following image depicts how the Accounting Sync tab is laid out when the Net Suite option is selected in the Integrate with external accounting at system level field.
Aspire GPS integration
Aspire has partnered with Agilis Systems, a leader in GPS tracking solutions for small, mid-sized, and enterprise-sized fleets, to add equipment GPS tracking features to Aspire. Based on this partnership, Aspire provides fee-based, real-time GPS vehicle reporting that integrates with the Aspire Crew Mobile application, the Aspire Schedule Board, and the Aspire Equipment module. Tracking is provided based on two different types of devices:
- Vehicle GPS trackers to plug into and track fleet vehicle miles and operation data (speeding, hard braking, etc.)
- Equipment GPS trackers connect to equipment assets to track operation hours.
Once enrolled with Agilis, you can log in to the FleetSharp application to acquire an integration IDa that they will copy and paste into the API Key fieldb on the Aspire GPS Integration tab of the Aspire Application Configuration screen, as depicted below.

The screen elements on the Aspire GPS Integration tab of the Application Configuration screen are described below.
Enable Aspire GPS integration
Enables the GPS integration with Agilis provided that the Agilis account has been properly established and allows access to other setup fields.
API key
Only displayed if the Enable Aspire GPS integration check box is selected. As shown above, get the API key from the FleetSharp application to enter this field.
Company
The Company tab allows you to specify company-specific configuration information.

Each of the screen elements on the Company tab of the Application Configuration screen is described below:
| Screen Element | Screen Element Description |
|---|---|
| Name | Required. Name of the company. |
| Company code | Identifies the company’s Aspire system. Used for first-time device authorization and system security. |
| Website | URL for the company’s website. |
| Phone | Company’s phone number. |
| Fax | Company’s fax number. |
| Logo | Clicking on the area to the right of the Logo label displays the Upload Attachment screen, allowing you to select the image file containing the company logo. Once you have uploaded the logo, it will be displayed after the logo label. The logo can be incorporated into layouts for forms generated by Aspire, such as proposals and customer invoices. |
| Address line 1 | First line of the company’s address. |
| Address line 2 | Second line of the company’s address. |
| City | City portion of the company address. |
| State | State portion of the company address. |
| Zip | Zip code portion of the company address. |
| Upload Attachment Screen | Opens when uploading a logo. Allows you to select and attach an image file for the company logo. |

Customer Portal 1.0

Aspire offers a Customer Portal that allows your customers to access their proposals, invoices, and issues via the web. The Customer Portal can be branded using your company logo and color scheme. The URL your customers use to access the Customer Portal is specific to each company. Before your customers can access the Customer Portal, the system administrator must enable it, and company personnel must send email invitations to their customers.
The Customer Portal is enabled and configured from the Customer Portal tab of the Application Configuration screen in Aspire.
When the Enable Client Portal check box is selected, the Customer Portal tab displays all the options for configuring the portal. The Customer Portal tab is broken into two sections:
- General Portal Configurationa – Specifies how the portal and customer invitations operate.
- Portal Designb – Defines how the portal will look visually when customers log in to it.

General portal configuration section of client portal
The screen elements on the General portal configuration section of the Client portal tab are described below.
Enable Customer Portal
Check box to enable the Customer Portal. Aspire adds the Send Customer Portal invitation option to the Actions menu on the Contacts Search List screen when this check box is selected. All other controls on the Customer Portal tab become visible when this check box is selected. When the check box is clear, all other controls become invisible.
Customer Portal domain
Allows selection of a third-level domain to be added to the front of PropertyServicePortal.com to form the URL that allows your customers to browse the portal. In the screenshot above, the full domain for the customer will be Incrediscape.PropertyServicePortal.com (not case-sensitive).
Customer Portal hyperlink
A hyperlink that will take you to the Customer Portal website, whose URL is represented by the hyperlink.
Customer Portal link description
In the invitation email sent to your client, you can insert a token ([CustomerPortalLink]), which represents a hyperlink your customer can select to sign up for the Customer Portal. When the token is expanded, the Customer Portal link description customizes the hyperlink text in the email.
Invitation email subject
Customize the default subject for email invitations so your customers can sign up for the portal. The field allows the insertion of expandable tokens that fill in with customer-specific information when the invitation email is sent to a customer. Available tokens:
- Contact Name—The first and last name of the person to whom the invitation email is sent.
Insert email token icon
Displays the Tokens screen, allowing you to select a token to insert into the Email subject field at the cursor's location.
Invitation email body
Customize the default body for email invitations for customers to sign up for the portal. The body is displayed by default when you select Send Customer Portal invitation in the Actions menu of the Contacts Search List screen. The field allows the insertion of expandable tokens that fill in with customer-specific information when the invitation email is sent to a customer. Available tokens:
- Contact Name—The first and last name of the person to whom the invitation email is sent.
- Customer Portal Link—Insert a hyperlink into the Customer Portal invitation email that takes the customer to the sign-up screen for the Customer Portal.
Portal design section of the client portal
The Portal Design section of the Client Portal tab provides a series of subsections that allow you to define the color scheme and images that should appear within the Customer Portal. The last subsection provides a preview area allowing you to review the effect of the changes made in the other subsections.

Preview subsection
The image below shows an example of the preview section and labels the different areas and controls based on the subsection that affects its visual look.

Customization subsection:
Summary of the customization screen elements:
| Subsection | Parameters | Description |
|---|---|---|
| Login – Defines the look of the Login screen. | Logo | Logo to display on the Login screen. |
| Page text | Text to display to customers on the Login screen. | |
| General – Defines parameters not overridden by more specific parameters below. | Display font | The font for displayed text, such as labels and grid content. |
| Input field font | The font to be used in fields that the customer types into. | |
| Background color | Primary background color for the portal. | |
| Border color | Border color for tables shown in the portal. | |
| Navigation bar – Defines the look of the navigation bar in the Customer Portal. | Logo | Logo to display in the navigation bar at the top of the portal. |
| Title | Title to display to the right of the logo in the navigation bar. | |
| Background color | Background color for the navigation bar. | |
| Font color | Font color for the navigation bar. | |
| Buttons – Defines the look of the buttons in the Customer Portal. | Background color | Background color for buttons. For buttons that are disabled, Aspire automatically mutes the specified color. |
| Font Color | Font color for buttons. | |
| Font | Font-face for the text on buttons. | |
| Dashboard – Defines the look of the dashboard area of the customer portal (as highlighted in the prior section). | Dashboard Text | Message to display to customers toward the top of the Customer Portal. |
| Font Color | Font color for Dashboard Text. | |
| Font | Font-face for the Dashboard Text. | |
| Show Invoices | Checkbox. Determines whether invoices are available to customers on the Customer Portal. | |
| Show Proposals | Checkbox. Determines whether proposals are available to customers on the Customer Portal. | |
| Show Issues | Checkbox. Determines whether issues are available to customers on the Customer Portal. | |
| Show Only Proposals within Specified Days | If proposals are available as determined by the Show Proposals checkbox, when you show open proposals, Aspire will only show open proposals whose opportunity start date is within the specified number of days from the current date. |
Customer Portal 2.0
The Customer Portal 2.0 is enabled and configured from the Customer Portal 2.0 tab of the Application Configuration screen in Aspire.
.jpg?sv=2022-11-02&spr=https&st=2025-10-04T04%3A54%3A19Z&se=2025-10-04T05%3A49%3A19Z&sr=c&sp=r&sig=JIFHgFUzTbodf%2BFm5rBRrUBprAkrA%2BX5HDQSB%2FFWBHc%3D)
Enabling and saving the 2.0 portal in Aspire disables the 1.0 portal. Existing customer logins will work in the new portal, so you do not need to resend invitations. The new portal will use the same URL as the 1.0 portal unless you change the subdomain in the general configuration.
When the Enable Client Portal toggle is switched on, the Customer Portal 2.0 tab displays all the options for configuring the portal. The Customer Portal 2.0 tab can be considered in two sections:
- General Portal Configuration: Specifies how the portal and customer invitations operate.
- Customize: Defines how the portal will look visually when customers log into it.

General portal configuration section of the Customer Portal
The screen elements on the General Portal Configuration section of the Customer Portal 2.0 tab are described below.
Enable Customer Portal
Select the Enable Customer Portal switch to activate or deactivate the feature. Aspire adds the Send Customer Portal Invitation option to the Bulk Actions menu on the Contacts Search List screen when the Customer Portal is activated. Turning this switch on makes all other controls on the Customer Portal 2.0 tab visible while disabling it hides these controls.
Enable Branch-Level Configuration
As a system administrator, select Enable Branch-Level Configuration to customize the Customer Portal settings across branches. Once enabled, a Branch dropdown displays, allowing you to select a specific branch, toggle the portal on or off for that branch, and configure branch-specific settings.
Customer Portal subdomain
This option enables the selection of a third-level subdomain to append to the front of PropertyServicePortal.com, forming the URL for customers to access the portal. In the provided screenshot, the customer's full domain will appear as Incrediscape.PropertyServicePortal.com (not case-sensitive).
Customer Portal link description
In the email template body (outlined below) sent to the client for portal registration, you have the option to insert a token ([CustomerPortalLink]) representing a hyperlink for customer signup. The content within the Customer Portal Link Description field dictates the text visible as the hyperlink in the invitation email to the customer once the token is expanded.
Customer Portal hyperlink
Clicking the hyperlink directs you to the Customer Portal website, whose URL is represented by the link.
Invitation email subject
Allows you to specify the default subject for email invitations for customers to sign up for the portal. The field allows the insertion of expandable tokens that fill in with customer-specific information when the invitation email is sent to a customer. Available tokens:
- Contact Name – The first and last name of the person to whom the invitation email is sent.
Insert email token icon
Displays the Tokens screen, allowing you to select a token to insert into the Email Subject field at the cursor's location.
Invitation email body
Enables you to define the default content for email invitations, prompting customers to register for the portal. When opting for the Send Customer Portal Invitation from the Actions menu in the Contacts Search List screen, this content serves as the default body of the email. The field supports the insertion of expandable tokens that dynamically populate with customer-specific details upon sending the invitation email. Available tokens:
- Contact name – The first and last name to whom the invitation email is sent.
- Customer Portal link – Inserts a hyperlink into the customer portal invitation email that takes the customer to the sign-up screen for the Customer Portal.
Customize section of the Customer Portal
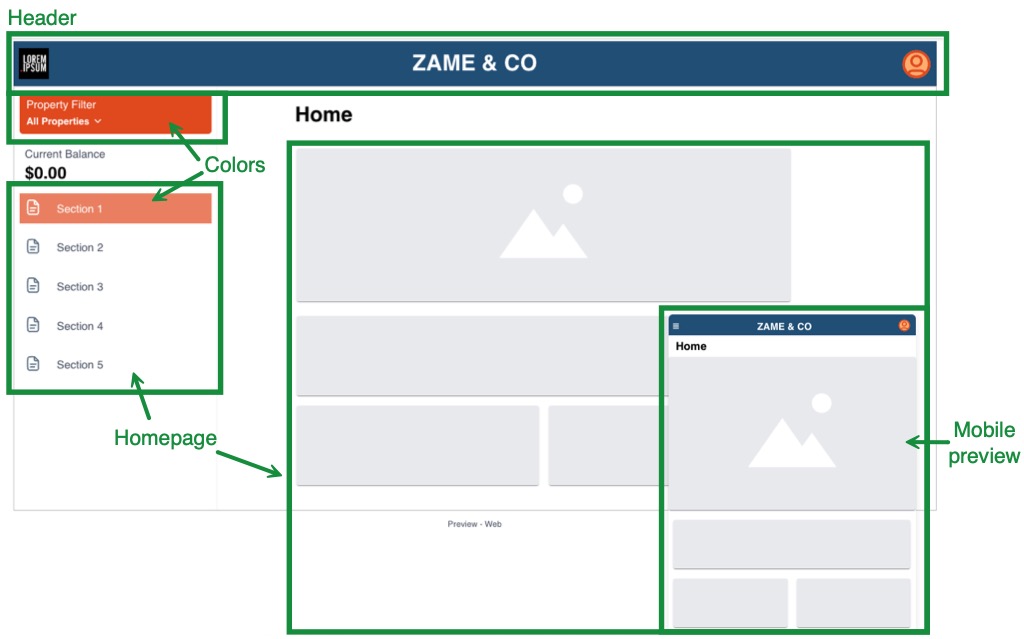
The Customize section of the Customer Portal 2.0 tab provides subsections for configuring the portal's Header, Homepage, Colors, and Settings. In these sections, you can set the service contact and define the color scheme, images, and marketing elements visible on the customer portal. The Preview section includes a preview area for web and mobile interfaces, allowing you to review the modifications made in the previous subsections.
Preview subsection
The image below shows an example of the preview section and labels the different areas and controls based on the subsection that affects its visual look.
Customization subsections
Summary of the customization screen elements:
| Subsection | Parameters | Description |
|---|---|---|
| Header – Defines the look of the top Header screen. | Background Color | Required. Primary background color for the portal. |
| Logo | Required. Logo to display on the Header screen. | |
| Align | Position to align the Logo or Page Title on the Header screen. | |
| Page Title | Title to display to customers on the Header screen. | |
| Homepage – Defines the look of the homepage area of the customer portal (as highlighted in the prior section). | Show Requests | Check box. Determines whether requests are available to customers in the Customer Portal. |
| Show Invoices | Check box. Determines whether invoices are available to customers in the Customer Portal. | |
| Show Proposals | Check box. Determines whether proposals are available to customers in the Customer Portal. | |
| Show Visits | Check box. Determines whether visits are available to customers in the Customer Portal. | |
| Carousel - Define up to three dashboard images with marketing elements for customer interaction. | Carousel images | The default value for Carousel Image #1 is Default Welcome Image, branded with your company color and featuring a generic welcome message that includes the customer’s name and the date. To upload your image for the Customer Portal dashboard, select Upload Custom Image from the menu, then select Upload Files to upload your image. Carousel Image #1 displays first, and customers can toggle through the other images in the carousel if you upload additional images. You have the option to upload up to three carousel images. Note: Aspire supports file attachments up to 30 MB. For best practices and information on file size settings, see Uploading Attachments in the Aspire Knowledge Base. To view a list of supported file types, see File types supported for uploads. |
Image URL | Enter a URL for each image. When a customer clicks the image, the URL opens in a new tab. | |
| Headline | Enter the text to display on the image. This headline will appear prominently on the carousel image. Note: The character limit is 75 characters. | |
| Colors - Defines the color of UI elements used across the portal. | Primary color | Required. Color used for interface elements (buttons, links, etc.). |
| Settings - Customize what customers see in the Customer Portal for improved clarity. | Service Contact | Check boxes. Decide whether to show your business's phone number (Office, Mobile, or both) on the Service Contact card.
 |
Pricing Display Options | Check box. Choose how service pricing appears on invoices and proposal screens. Check the option to show detailed pricing for individual services or leave it unchecked to show a total price for all services combined. | |
| Payment | Use this section to define payment types and set payment ranges. At least one payment type must be enabled. The following options are available for configuration:
Configuration Options:
|
Electronic payments
Once the CardConnect account has been established and Aspire has enabled the Electronic Customer Payment Processing feature, the Electronic Payments tab of the Application Configuration Screen becomes available, as shown below. You can use this tab to configure customer electronic payments.

The screen elements on the Electronic Payment tab of the Application Configuration screen are described below.
Merchant ID
This is the identifier assigned to the company when you register with the credit card processor, CardConnect. The value of this field is encrypted when stored in Aspire.
User name
This user name is established when registering with the card processor, CardConnect. The value of this field is encrypted when stored in Aspire.
Password
This is the password established when registering with the credit card processor, CardConnect. The value of this field is encrypted when stored in Aspire.
Merchant zip
The company's primary zip code is what you provide when registering with CardConnect. Used to validate the company for credit card processing.
Allow branch override
The Allow Branch Override check box allows companies to set up each branch to connect to its instance of the CardConnect payment processor for accepting electronic payments. Companies set up this way must have a separate CardConnect Merchant ID for all branches. When this check box is selected, an additional tab becomes available on the Branch screen, allowing the system administrator to set up accounting system connectivity for each branch.
 When you hover over the Info icon next to this option, a tooltip says, "Allow electronic payment accounts to be configured at the branch level. This is useful if multiple companies are configured inside the same Aspire system."
Add credit/debit card convenience fee %
This lets you specify that a convenience fee will be added to electronic credit/debit card customer payments based on a percentage of the payment amount. These fees are not applied to ACH payment transactions.
Currency
This lets you specify that payments will be received in US dollars (USD) or Canadian dollars (CAD).
Electronic signature
Aspire allows customers to sign proposals that sales representatives send them electronically and that they receive by email. The email provides a link to complete a simple signing process.
You must enable the electronic signature capability on the Electronic Signature tab of the Application Configuration screen to make it available.

The following table describes the screen elements available on the Electronic Signature screen:
Enable electronic signatures
Selecting this check box enables electronic signature capability within the system. Once checked, Aspire adds a check box to the Bulk Email Opportunity Proposal screen available from the Bulk Actions menu on the Opportunities Search List screen.
Job number description
When the customer clicks on the link in the proposal email to initiate their electronic signature, they will be taken in their primary browser to a login window where they must enter their email address and the job number. The value of this field determines how the job number field will be labeled for customers on that login screen.
Electronic link description
This field allows you to specify the string that will replace the tokena (“[Electronic Signature Link]”) in the email that accompanies a proposal to the customer. For example, you might specify something like, “Click here to sign the proposal.” In the email received by the customer, this string will appear as a hyperlink that will initiate the signature process when they click it.
Email subject
This field allows you to specify a default subject for the email accompanying proposals sent to customers for electronic signature. It supports expandable tokens.
Sales rep email subject
This field allows you to specify the subject of the email sent to the sales rep responsible for the opportunity when the customer completes entering their electronic signature on the proposal. It supports expandable tokens.
Email body
This field allows you to specify the default body for the email accompanying proposals sent to customers for electronic signature. It supports expandable tokens described in the Aspire User Guide. This is the message that is sent to the customer.
Sales rep email body
Allows you to specify the body of the email sent to the sales rep responsible for the opportunity when the customer completes entering their electronic signature on the proposal. This field supports expandable tokens.
Confirmation message
This message is displayed to customers when they successfully electronically sign the proposal.
Invoicing
The Invoicing tab Allows you to specify configuration information related to invoicing customers. Each screen element on the Invoicing tab of the Application Configuration screen is described below.  Standard billing overdue after days
Specify the number of days from work completion or scheduled invoice date (depending on invoice type), after which the Invoicing Assistant color codes standard billing payments as Overdue for billing to the customer. The Invoicing Assistant screen color codes invoice recommendations that are overdue and labels them as Overdue in the color-coding legend. Standard billing represents the following invoice types: Fixed Payment, T&M, Per Service, and Fixed Price on Completion.
Standard billing ready after days
Specify the number of days from work completion or scheduled invoice date after which the invoice assistant color codes a billing payment as Ready for billing the customer. The Invoicing Assistant screens color codes invoice recommendations and labels them as Ready in the color-coding legend. Standard billing represents the following invoice types: Fixed Payment, T&M, Per Service, and Fixed Price on Completion. Note that Fixed Price on Payment Schedule services is recommended for purchase assistants based on the percent complete – not on a date.
Open billing overdue after days
For construction, it is common to set work orders up with open billing and then bill monthly. This field lets you specify the number of days from the prior invoice date, after which the Invoicing Assistant color codes the next open billing payment as overdue for billing to the customer. The Purchasing Assistant screen color codes invoice recommendations that are overdue and labels them as Overdue in the color-coding legend. Open billing represents the Fixed Price Open Billing invoice type.
Open billing ready after days
For construction, it is common to set work orders up with open billing and then bill monthly. This field allows you to specify the days from the prior invoice date, after which the Invoicing Assistant will present a recommended payment ready for invoicing. The Invoicing Assistant screen color codes invoice recommendations and labels them as “Ready” in the color-coding legend. Open billing represents the Fixed Price Open Billing invoice type.
Indicates that properties on an opportunity must have a designated company before Aspire allows invoices to be generated. This option will typically only be used by clients who work exclusively on commercial contracts and work orders—not residential—or require that “companies” be set up in Aspire for their residential customers. If this checkbox is checked, residential customers must be set up as companies in Aspire.
Enabling this option affects the behavior of the Invoicing Assistant screen, which displays invoice recommendations based on upcoming or due invoice payments as determined by in-process opportunities and the invoice types of their associated services. If this option is enabled, and the billing contact for the property associated with a service due for payment is not assigned to a company, then Aspire will color-code that recommendation on the Invoicing Assistant screen.
Invoice email from
When Aspire sends invoices to the customer, the value you specify here determines from whom the email will be sent. You may choose to send invoices from the employee marked as the account owner for the associated property or specify a specific employee contact. If a more specific value is specified at the region or branch level, the most specific value will be used.
Invoice email CC
Allows you to specify an email address that will be cc’d when invoices are sent. If a more specific value is specified at the region or branch level, the most specific value will be used.
Invoice email subject
Allows you to specify an email subject displayed when invoices are sent via email. If a more specific value is specified at the region or branch level, the most specific value will be used. This field allows you to insert expandable tokens that are replaced with specific values for the invoice.
Invoice email body
Allows you to specify an email body that will be presented when invoices are sent via email. If a more specific value for the email body is specified at the region or branch level, the most specific value will be used. This field lets you insert expandable tokens replaced with specific values for the invoice and insert images.
Invoice on completion description
For invoices on services marked for invoice upon completion (T&M or fixed price), you can specify the line item displayed on the invoice. If a more specific value for this description is specified for the Invoice on the Completion Description at the region or branch level, the most specific value will be used. This field allows you to insert expandable tokens that are replaced with specific values for the invoice.
Time reporting
The Time Reporting tab lets you specify configuration information related to time reporting.

Screen elements on the Time Reporting tab of the Application Configuration screen are described below. You can also watch the following video for an overview of the Time Reporting screen.
Break time
If you do not require crew members to clock out for lunch and assume a standard lunch break period, specify the standard period here in hours. For example, specifying a value of .5 is ½ hour. If you require crew members to clock out during lunch, set this value to zero.
First day of week
Required. Specify the first day of the workweek for payroll purposes. Valid values are Monday, Tuesday, Wednesday, Thursday, Friday, Saturday, or Sunday.
Default GEO perimeter
Allows you to specify a circular area measured in feet from the center of a property within which crew members must clock into their work sights. The property center is based on Google’s latitude/longitude for the address. Determines push-pin color on the Time Entry screen for time clock-in (vs. property start for jobs).
Round clock in/out times to the nearest 15 minutes
If checked, Aspire will round clock-in and clock-out times to the nearest 15 minutes. This selection does not affect job time entries.
Early lunch clock-in warning time (minutes)
For states with minimum lunch-time requirements. The value of zero turns off the warning. If a value is provided, and a Crew Mobile App user clocks out and then later clocks in before the specified number of minutes have elapsed, the user will receive a warning that they are not yet required to return from lunch.

Use time prompts
When this check box is selected, and employees clock out through the Crew Mobile App, they are provided with the dialog shown at the right, to which they must respond. 
Auto Time Acceptance
The Auto Time Acceptance feature simplifies time acceptance tasks for janitorial clients by automating time entry acceptance processes. This feature automatically assesses time entries for acceptance. In doing so, time is effortlessly accepted, and time approval errors can be quickly spotted.
After enabling this feature, you can determine when time entries are processed for acceptance. The selected time will process all of the time records for the previous day.
- Enable Auto Time Acceptance - You can switch auto-time acceptance on or off. By default, the feature is off.
- Process records at- set the time at which time entries should be processed for acceptance.
- The default time set is 11:00 PM.
- To prevent timing complications, midnight is not an option.
- The time zone considered will reflect the same system settings as the time zone configured under the Application subsection of the Configuration section of the Administration menu.
- Threshold %- set a variance threshold percentage to determine the time needed to be worked within a work ticket by a time-based route before it is considered acceptable for time entry.
- Suppose you have a crew member whose actual work time does not match the scheduled work time. Their time can still be accepted, provided it does not fall below or above the given threshold percentage.
- When Custom Threshold is not selected, no threshold will be applied.
For more information, see Auto Time Acceptance.
OT calculation
Allows you to choose one of two options for Aspire to calculate overtime for employees:
- Standard – Aspire’s standard calculation method only calculates overtime on employees’ hours specified under the employee’s standard pay code. Employee standard pay code is defined by the pay schedule that is assigned to them. Weekly hours for which the employee’s standard pay code has been overridden (i.e., by a service default pay code, opportunity service default pay code, or pay code selected in time entry) are paid at the pay code rate unless manually circumvented – even if the standard pay with overtime might have been greater.
- Override Pay Codes – This method of calculating overtime allows Aspire to account for all time – to the employee’s standard pay code or an override pay code. Aspire works backward through the overtime hours for the week, calculating as follows:
- When hours beyond those specified for regular hours (non-overtime) by the employee’s pay schedule have an override pay code, Aspire will determine whether the employee benefits more by regular pay with overtime (overtime pay code), or from the special override hours. Aspire will use the pay code for the larger of those two values to calculate employee pay.
- When hours beyond those specified for regular hours (non-overtime) by the employee’s pay schedule have the employee’s standard pay code, Aspire will apply the overtime pay code.
Equipment reading clock out prompt
Aspire allows you to configure the Crew Mobile App to prompt crew members for equipment meter readings. This field also permits you to enable this feature and to specify when the Crew Mobile App will prompt the crew leader. Readings can never be collected upon clicking the Complete button for a job, on clock out each day, or clock out for a chosen day of the week. Available options are blank (option disabled), Per Job, End of Day, Sunday, Monday, Tuesday, Wednesday, Thursday, Friday, or Saturday.
Default clock time on employee time card report
If this option is selected, the clock-in and clock-out on the Employee Time Card Report are only determined by the earliest Clock In time and latest Clock Out time for the employee for the day – work ticket start and stop times are not considered. Otherwise, the earliest and latest work ticket times are considered as well.
Legacy Sub portal
Legacy Sub portal toggle
Selecting this box will allow subcontractor contacts who have been provided with user accounts to access the Subcontractor Portal.
Sub portal 2.0 toggle
You can enable the legacy Subcontractor Portal and Subcontractor Portal 2.0 at the same time. Any enabled options will apply to both portals.
Inviting subcontractors to the portal
You can bulk invite multiple subcontractors to the portal or individually.
- In the Time Reporting tab of the Configuration screen, select Send Invites.
- Choose each name or select Invite All.
The Subcontractor Portal 2.0 must be enabled to bulk invite subcontractors. Subcontractors will receive an email invitation, configure their own account, and view their assigned routes and work tickets.
Enable sub access to Crew Mobile
Selecting this box will allow subcontractor contacts without user accounts to log into the Crew Mobile App. Subcontractor contacts with established user accounts can log into crew mobile regardless of this setting. The Crew Mobile App will be available for a limited time.
Enable tickets to be created from Sub Portal
When disabled, it prevents the Subcontractor Portal user from creating work tickets for any service not scheduled on the Schedule Board.
Enable partial occurrence to be specified from Sub Portal
When this option is enabled, a Partial Occurrence icon appears in the Subcontractor Portal on the Work Ticket screen. Clicking this icon allows subcontractors to specify a partial occurrence percentage indicating how much of the expected effort/time was required per service work ticket. This value is available on the Work Ticket screen to guide office staff when setting the partial occurrence value for the work ticket.
Allow Sub Portal time after month has been closed
When this option is disabled, and a subcontractor logs in to the Subcontractor Portal and sets the date at the top of the screen to a closed month, the screen will be disabled so that they cannot add time or materials. When this option is enabled, and you set the date at the top of the Subcontractor Portal screen to a closed month, the screen is enabled, but you are allowed to enter the number of hours worked directly – they cannot specify the start and stop times for the work.
Note: Options enabled for the Legacy Subcontractor Portal will be applied to the Subcontractor Portal 2.0.
Mobile
Mobile time reporting timeout (seconds)
Period of inactivity, after which the mobile time app will automatically log out on the mobile device for security reasons. The recommended timeout is 300 seconds (5 minutes).
Disable Mobile Crew management
Crew leaders can clock in and out on behalf of crew members. To require individual crew members to clock in themselves, select this box. When this check box is selected, the Crew button will not be available to crew leaders in the Crew Mobile App.
Enable Sub tickets to be created from Crew Mobile
When disabled, it prevents subcontractor Crew Mobile users from creating work tickets from As Needed services. Unlike the “Enable tickets to be created from Sub Portal” option, this option does not prevent Crew Mobile users from adding time to unscheduled work tickets that already exist.
Enable partial occurrence to be specified from Crew Mobile
When this option is enabled, a Partial Occurrence button appears in the Crew Mobile App on the Work Ticket screen. Clicking this icon allows crew leaders (especially for subcontractors) to specify a partial occurrence percentage, indicating how much of the expected effort/time was required on per-service work tickets. This value is available on the Work Ticket screen to guide office staff when setting partial occurrence value for the work ticket.
Include drive time when logging equipment from Crew Mobile
This setting instructs Aspire to add drive time to the time logged for equipment. When the crew leader starts time on a work ticket from the Crew Mobile App, equipment is estimated for the work ticket, and the route has the Allow Equipment Time Reporting option enabled; they can also log the time to the equipment. Time allocated to equipment in this manner shows up in the Time Entry screen of the Aspire Desktop. When the Include Drive Time when Logging Equipment from Crew Mobile option is enabled, and office staff accept time, Aspire will update the logged equipment hours value to include the drive time calculated for the work ticket. If the Aspire Desktop user goes back into the Time Entry screen, they will see that the time allocated for equipment matches the time on the work ticket, including drive time.
Early lunch clock-in warning time (minutes)
For states with minimum lunch-time requirements. The value of zero turns off the warning. If a value is provided, and a Crew Mobile App user clocks out and then later clocks in before the specified number of minutes have elapsed, the user will receive a warning that they are not yet required to return from lunch.
Prompt for new ticket in Crew Mobile app checkbox
The Aspire Crew Mobile App offers two behaviors when the crew leader selects an unscheduled service through the Property or New Ticket button on the Schedule screen, provided an existing work ticket for the service has time logged within the past 24 hours. This checkbox lets you control the app’s behavior.
When selected (enabled), the app prompts the crew leader to choose whether to use the existing work ticket with logged time or select another open work ticket.
For some companies, it may be preferable not to display this prompt. In this case, clearing (disabling) the checkbox automatically creates a new work ticket and takes the crew leader directly to the Work Ticket screen.
Allow crew member mobile clock-in without crew leader
This feature allows crew members to clock in from their mobile devices. The crew leader will need to authorize this by logging in on the device the crew member will use. The crew member will then need to log in with their PIN, and they can then clock in. This setting can be enabled at both the system and branch levels. When the setting is enabled at the system level, it can not be seen on the branch details screen. Enable for select branches by disabling this option under the Time Reporting section of the Configuration section of the Administration menu and enable the feature individually at the branch level.
Payroll
Payroll export format
When you select the Export or Export All Employees option from the bulk actions menu on the Weekly Time Review screen, determine the export file format generated. Provides the following options: Preview, Preview tab-delimited, Flex, QuickBooks Desktop, Ultimate, Paychex Flex with Job Number, and Aspire Payroll.
Include dates in Paychex export
This option should be selected if you synchronize payroll information with Paychex Desktop or Paychex Online. Otherwise, leave it cleared.
Companies that use a payroll service will work with their payroll service to determine the appropriate export format by providing examples of the following formats:
- Preview - the Preview (Tab Delimited) format.
- Flex - format is specifically designed for use with the Paychex payroll service.
- Ultimate - format is used for companies that use the same name's payroll system.
Inova
Activate or deactivate Inova payroll services. Inova is Aspire's preferred payroll vendor. Once Inova is activated, other payroll export options will be disabled. Select Inova Settings and Labor Burden True-Up for more information.